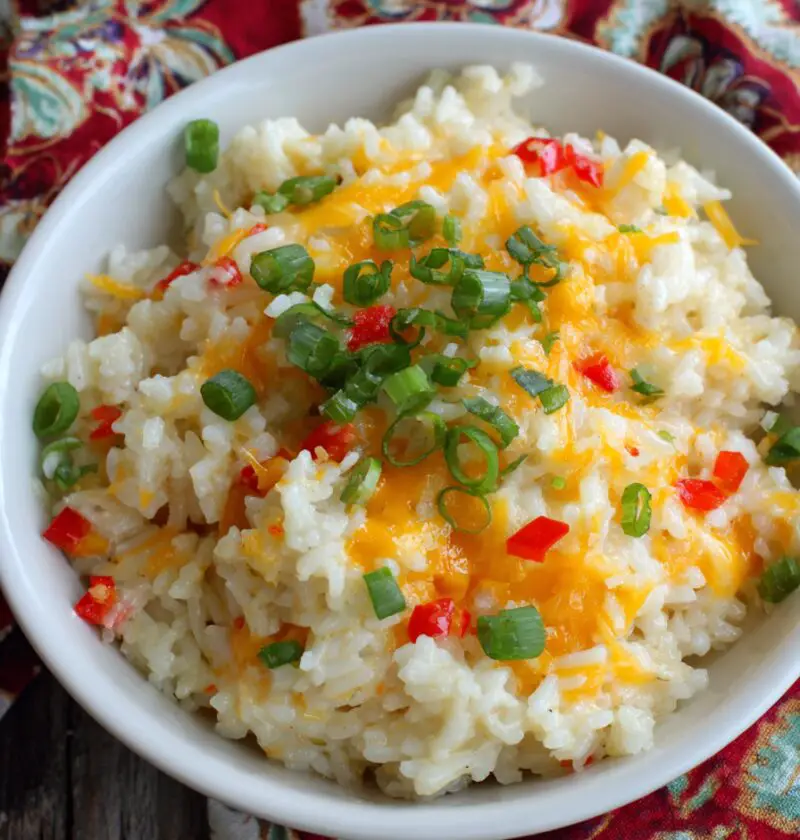
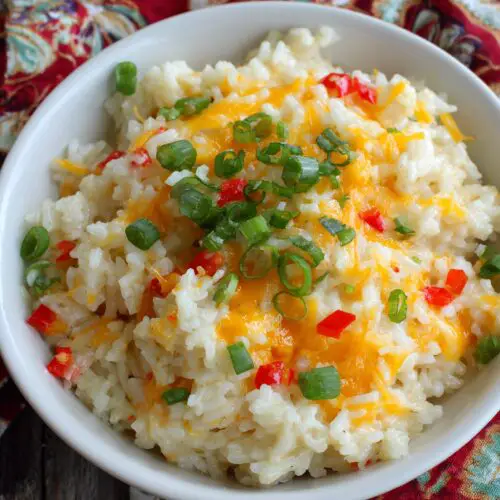
Cheesy Rice Recipe (Creamy, Comforting, and So Easy)
If you’re craving something cozy, quick, and wonderfully cheesy, this Cheesy Rice Recipe is about to become your new weeknight hero—creamy, skillet-made, and ready in less than 30 minutes.
I’ve raised three kids, worked more late nights than I care to admit, and this cheesy rice has been my secret “everyone will eat this” side dish for years. It’s a stovetop cheesy rice recipe that tastes like a hug in a bowl: tender rice, melty cheddar, a touch of butter, and a creamy texture that clings to every grain. Think of it as the friendly cousin of mac and cheese—just with rice instead of pasta.
What makes this homemade cheesy rice special? It’s comforting without being fussy, family friendly, and uses simple pantry ingredients you probably already have. It works with just about any main dish: roasted chicken, grilled sausage, meatloaf, or even a veggie-packed salad when you’re trying to balance things out a bit. And because the whole thing comes together in one skillet, clean-up is almost as comforting as the rice itself.
Why You’ll Love This Cheesy Rice Recipe
Here’s the thing: cheesy rice sounds simple (and it is), but a good one checks a lot of boxes:
- Quick weeknight winner – This creamy cheesy rice is ready in about 25 minutes, start to finish.
- One-pan, stovetop cheesy rice – Everything cooks in one skillet—no baking, no extra pots.
- Kid and adult approved – It’s a family friendly rice dish that picky eaters and grown-ups both love.
- Customizable cheese and rice recipe – Use cheddar, Monterey Jack, Colby, or a blend—whatever your fridge is offering.
- Budget-friendly ingredients – Simple rice, broth, and cheese turn into something that tastes like a restaurant side.
- Perfect cheesy side dish – Serve it with chicken, pork chops, or roasted veggies and dinner feels complete.
- Creamy but not gloopy – The rice stays tender and separate, while the sauce is silky and rich.
- Great for meal prep – It reheats beautifully for quick lunches or next-day leftovers.
Ingredients
For this easy cheesy rice recipe, you’ll need:
- 1 cup long-grain white rice (uncooked; I like Jasmine or standard long-grain for fluffy texture)
- 2 tablespoons unsalted butter
- 1 tablespoon olive oil (helps keep the butter from browning too fast)
- 1 small yellow onion, finely diced (about ½ cup)
- 2 cloves garlic, minced
- 2 cups low-sodium chicken broth (or vegetable broth for a meatless version)
- ½ teaspoon kosher salt (more to taste, depending on your broth)
- ¼ teaspoon black pepper
- ¼ teaspoon paprika (optional, for a little color and warmth)
- ½ cup whole milk (or half-and-half for extra creaminess)
- 1 cup shredded sharp cheddar cheese, packed (freshly shredded melts best; avoid pre-shredded if you can)
- ¼ cup grated Parmesan cheese (adds a savory “nutty” note and helps thicken)
- 2 tablespoons cream cheese, softened (optional but amazing for ultra creamy cheesy rice)
- 2 tablespoons chopped fresh parsley or chives (for garnish; optional but pretty)
A few ingredient notes:
- Rice: Long-grain white rice gives you that classic fluffy-but-creamy texture. Short grain will be stickier and more risotto-like. Brown rice works, but you’ll need extra liquid and cook time (see Variations).
- Cheese: Sharp cheddar gives the best “classic cheesy rice” flavor. A blend of cheddar and Monterey Jack makes it extra melty.
- Milk/Cream: Use whole milk or half-and-half. Skim milk can make the sauce thinner and less satisfying.
- Broth: Low-sodium lets you control the salt. Taste at the end and adjust—cheese itself adds a lot of saltiness.

Directions (How to Make This Creamy Skillet Cheesy Rice)
-
Sauté the aromatics
- In a large skillet or saucepan with a lid, heat the butter and olive oil over medium heat.
- Add the diced onion and a pinch of salt. Cook, stirring occasionally, for 3–4 minutes, until the onion is soft and translucent.
- Stir in the minced garlic and cook 30 seconds, just until fragrant (garlic goes from golden to burnt fast, so stay close).
-
Toast the rice for better flavor
- Add the uncooked long-grain rice to the pan. Stir well to coat the rice in the butter and oil.
- Cook for 1–2 minutes, stirring, until some of the grains look slightly opaque and you smell a toasty aroma.
- This small step helps the rice keep a better texture and builds flavor.
-
Add broth and seasonings
- Pour in the chicken broth, then sprinkle in the salt, black pepper, and paprika. Stir to combine.
- Bring the mixture up to a gentle boil over medium-high heat, then immediately reduce the heat to low.
- Cover the skillet with a tight-fitting lid.
-
Simmer until rice is tender
- Let the rice simmer on low for 15–18 minutes, without lifting the lid if you can resist peeking.
- At around 15 minutes, quickly check: the liquid should be absorbed and the rice tender. If it’s not quite done and looks dry, splash in 2–3 tablespoons of water or broth, cover, and cook another 2–3 minutes.
-
Fluff and add creaminess
- Turn the heat down to low (or even off, if your burner runs hot).
- Gently fluff the rice with a fork to loosen the grains.
- Stir in the milk (or half-and-half) and cream cheese, if using. Warm for 1–2 minutes, stirring gently, until everything is steamy and smooth.
-
Stir in the cheese (the fun part)
- Sprinkle in the shredded cheddar and Parmesan a handful at a time, stirring slowly after each addition.
- Keep the heat low so the cheese melts into a creamy sauce instead of turning grainy.
- Taste and adjust seasoning with a bit more salt or pepper if needed.
-
Rest and garnish
- Turn off the heat and let the cheesy rice sit for 3–5 minutes. This rest time helps it thicken to that perfect creamy-but-scoopable texture.
- Stir once more, then sprinkle with chopped parsley or chives before serving.
Texture tip: If your cheesy rice feels too thick, stir in a splash more warm milk or broth. If it’s too loose, let it sit uncovered for a few extra minutes or gently simmer on low, stirring, until it thickens.
Servings & Timing
- Yield: Serves 4–6 as a side dish (about 4 generous cups)
- Prep Time: 5–10 minutes
- Cook Time: 18–20 minutes
- Total Time: About 25–30 minutes
This makes a perfect quick cheesy rice side for a busy weeknight, but I’ve also doubled it and served it in a big bowl for family gatherings—people scoop it like mashed potatoes.
Variations (Make This Cheesy Rice Recipe Your Own)
You know what? Once you master the basic creamy cheesy rice, it’s incredibly easy to play around. Here are some of my favorite twists:
- Broccoli Cheddar Cheesy Rice: Stir in 1–1½ cups of very small steamed broccoli florets during the last 3–4 minutes of cooking, then add the cheese as written.
- Loaded Cheesy Rice: Fold in cooked, crumbled bacon (or diced ham), green onions, and a little extra cheddar on top—like a baked potato in rice form.
- Spicy Skillet Cheesy Rice: Add ¼–½ teaspoon cayenne pepper or red pepper flakes with the paprika, and use Pepper Jack for a kick.
- Mexican-Inspired Cheesy Rice: Swap ½ cup of the broth for salsa, use a Mexican cheese blend, and fold in black beans and corn at the end.
- Brown Rice Cheesy Rice: Use long-grain brown rice, increase broth to 2½ cups, and simmer 35–40 minutes, then proceed with the milk and cheese.
- Lighter Cheesy Rice: Use reduced-fat cheddar and 2% milk, and skip the cream cheese; it won’t be quite as rich but still very satisfying.
Storage & Reheating
This rice reheats better than a lot of pasta dishes, which is one reason I lean on it for meal prep or “cook once, eat twice” nights.
- Fridge:
- Store leftover cheesy rice in an airtight container for up to 4 days.
- Freezer:
- Cool completely, then transfer to freezer-safe containers or zip-top bags (press out extra air).
- Freeze for up to 2 months. The texture softens a bit after freezing, but the flavor is still lovely.
- Reheating on the stovetop:
- Add a splash of milk or broth to a skillet, then stir in the rice.
- Warm over low to medium-low heat, stirring often, until heated through and creamy again.
- Microwave reheating:
- Place a portion in a microwave-safe bowl, sprinkle with a tablespoon or two of milk, cover loosely, and heat in 30–45 second bursts, stirring between each, until hot.
- Reheating from frozen:
- Thaw overnight in the fridge when possible, then reheat as above.
- In a pinch, reheat straight from frozen with a generous splash of milk and a bit more patience on low heat.
Make-ahead tip: You can cook the rice up through Step 4 earlier in the day, then rewarm gently with milk and cheese right before serving. This gives you “fresh” cheesy rice with less last-minute effort.
Notes from My Kitchen (Little Things That Make a Big Difference)
- Freshly shredded cheese really matters. Bagged shredded cheese has anti-caking agents that can make your sauce grainy or less smooth. If your hands allow (mine get a bit tired some days), shred from a block—worth it.
- Don’t boil after adding the cheese. High heat can cause the cheese proteins to seize and turn your sauce oily. Keep it low and gentle.
- Salt at the end. Broth, cheese, and Parmesan all bring salt. Taste first, then salt—this is where many cheesy rice recipes go from “comforting” to “whoa, that’s salty.”
- Adjust the creaminess to your mood. Some nights I like it looser, almost like a cheat’s risotto; other nights I let it sit a bit longer, so it’s scoopable like mashed potatoes. Both are good.
- Use what you have. Leftover rotisserie chicken, stray veggies in the drawer, that handful of spinach—it can all be folded into this rice and suddenly you’ve got a full meal.
- A note for sensitive stomachs. If onion or garlic are tough on you, reduce the amount or cook them a bit longer and slower to mellow the flavor.
Honestly, after making this a few dozen times, I’ve realized it’s less about perfection and more about comfort. If it’s cheesy, warm, and everyone is going back for seconds, you’re doing it right.
FAQs About Cheesy Rice
1. Can I use instant or minute rice for this Cheesy Rice Recipe?
Yes, you can, but reduce the broth amount and follow the cook time on the package; add the cheese after the rice is tender so it doesn’t overcook or turn mushy.
2. How do I keep my cheesy rice from turning gluey?
Use long-grain rice, avoid over-stirring while it cooks, and keep the heat low when adding the cheese—too much stirring or high heat can make it gummy.
3. Can I make this cheesy rice recipe vegetarian?
Absolutely—simply use vegetable broth instead of chicken broth, and check that your cheeses are vegetarian-friendly if that’s important to you.
4. What cheeses work best besides cheddar?
Monterey Jack, Colby Jack, Gouda, or a blend of cheddar and mozzarella all work well; just keep at least some cheddar or Parmesan for flavor depth.
5. My sauce turned grainy. What went wrong?
Grainy sauce usually means the heat was too high or pre-shredded cheese was used; keep the heat low and add freshly shredded cheese slowly, stirring gently.
6. Can I make this cheesy rice in a rice cooker?
Yes—cook the rice with broth and seasonings in the rice cooker, then stir in warm milk and cheese at the end while it’s on the “warm” setting.
7. How can I add more protein to this comforting rice dish?
Stir in cooked chicken, ground turkey, crumbled bacon, or even a can of drained white beans for a hearty, one-pan cheesy rice meal.
8. Is this easy cheesy rice spicy?
As written, no—it’s mild and kid-friendly; if you like heat, add cayenne, red pepper flakes, or a bit of your favorite hot sauce.
Conclusion (Let’s Get Cheesy)
This Cheesy Rice Recipe is one of those humble little dishes that quietly saves dinner again and again—creamy, cozy, and made with ingredients you probably have on hand. It’s simple enough for a busy Tuesday, but comforting enough for Sunday dinner, and it’s endlessly adaptable to whatever’s in your fridge.
If you make this cheesy rice, I’d love to hear how it went—did your family inhale it like mine does? Leave a comment, rate the recipe, or share your favorite twist (broccoli, bacon, extra spicy?). And if you’re in a cheesy mood, this pairs beautifully with baked chicken, meatloaf, or even a crisp green salad for a cozy, balanced meal.
Cheesy Rice Recipe (Creamy, Comforting, and So Easy)
Ingredients
- 1 cup long-grain white rice uncooked; Jasmine or standard long-grain
- 2 tablespoons unsalted butter
- 1 tablespoon olive oil
- 1 small yellow onion finely diced (about 1/2 cup)
- 2 cloves garlic minced
- 2 cups low-sodium chicken broth or vegetable broth
- 1/2 teaspoon kosher salt more to taste
- 1/4 teaspoon black pepper
- 1/4 teaspoon paprika optional, for color and warmth
- 1/2 cup whole milk or half-and-half for extra creaminess
- 1 cup sharp cheddar cheese shredded, packed; freshly shredded melts best
- 1/4 cup Parmesan cheese grated
- 2 tablespoons cream cheese softened; optional for extra creaminess
- 2 tablespoons fresh parsley or chives chopped, for garnish (optional)
Instructions
- In a large skillet or saucepan with a lid, heat the butter and olive oil over medium heat. Add the diced onion and a pinch of salt. Cook, stirring occasionally, for 3–4 minutes, until the onion is soft and translucent. Stir in the minced garlic and cook for about 30 seconds, just until fragrant.2 tablespoons unsalted butter, 1 tablespoon olive oil, 1 small yellow onion, 2 cloves garlic
- Add the uncooked long-grain rice to the pan. Stir well to coat the rice in the butter and oil. Cook for 1–2 minutes, stirring, until some of the grains look slightly opaque and you smell a toasty aroma.1 cup long-grain white rice
- Pour in the chicken broth, then sprinkle in the salt, black pepper, and paprika (if using). Stir to combine. Bring the mixture to a gentle boil over medium-high heat, then immediately reduce the heat to low and cover the skillet with a tight-fitting lid.2 cups low-sodium chicken broth, 1/2 teaspoon kosher salt, 1/4 teaspoon black pepper, 1/4 teaspoon paprika
- Let the rice simmer on low for 15–18 minutes without lifting the lid if possible. At around 15 minutes, quickly check: the liquid should be absorbed and the rice tender. If it’s not quite done and looks dry, splash in 2–3 tablespoons of water or broth, cover, and cook another 2–3 minutes.
- Turn the heat down to low (or off, if your burner runs hot). Gently fluff the rice with a fork to loosen the grains. Stir in the milk (or half-and-half) and cream cheese, if using. Warm for 1–2 minutes, stirring gently, until everything is steamy and smooth.1/2 cup whole milk, 2 tablespoons cream cheese
- Sprinkle in the shredded cheddar and Parmesan a handful at a time, stirring slowly after each addition. Keep the heat low so the cheese melts into a creamy sauce instead of turning grainy. Taste and adjust seasoning with a bit more salt or pepper if needed.1 cup sharp cheddar cheese, 1/4 cup Parmesan cheese
- Turn off the heat and let the cheesy rice sit for 3–5 minutes to thicken to a creamy-but-scoopable texture. Stir once more, then sprinkle with chopped parsley or chives before serving. If the rice is too thick, stir in a splash more warm milk or broth; if it’s too loose, let it sit uncovered for a few extra minutes or gently simmer on low, stirring, until it thickens.2 tablespoons fresh parsley or chives