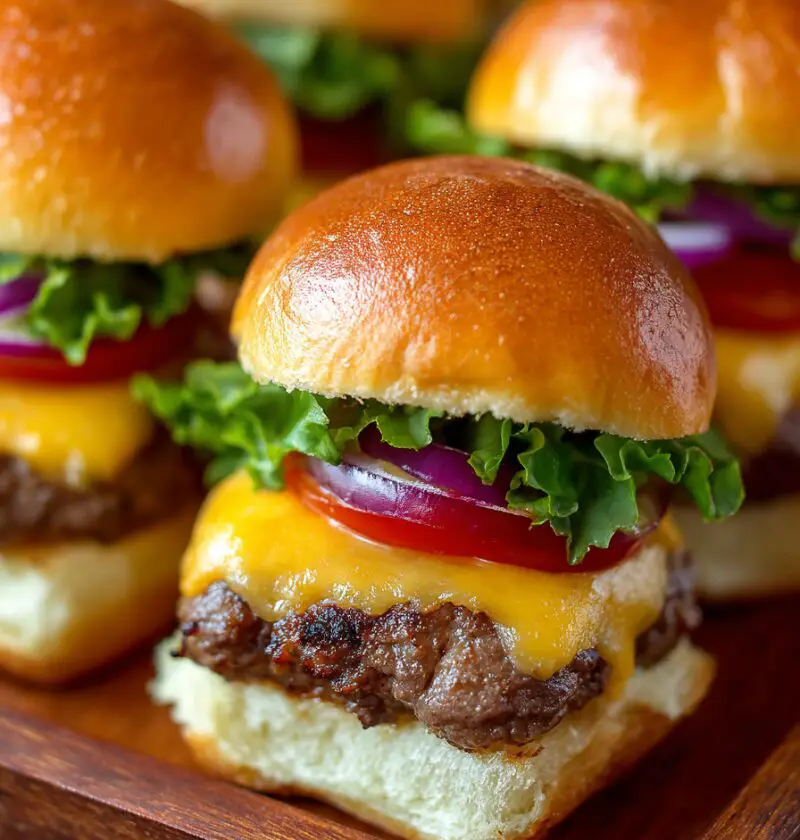
Cheeseburger Sliders Recipe
If you need a crowd-pleasing Cheeseburger Sliders Recipe that’s easy, cheesy, hearty, and perfect for weeknights, parties, or game day, this one checks every box. These juicy little cheeseburger sliders are baked until melty and golden, then served hot on soft rolls for the kind of dinner everyone reaches for twice.
A cozy little classic everyone loves
There’s something about mini cheeseburgers that makes people smile before they even take a bite. Maybe it’s the soft buns, maybe it’s the gooey cheese, or maybe it’s that sliders feel a little more fun than regular burgers. Whatever the reason, this slider recipe has become one of my go-to meals when I want something comforting without standing over a grill for an hour.
I started making these burger sliders years ago for football Sundays and family movie nights. Back then, I wanted a recipe that tasted like a backyard burger but worked in my kitchen, especially when the weather was too cold or too rainy to fuss with the grill. These baked sliders were the answer. They’re made with seasoned ground beef, onions, cheddar cheese, and soft dinner rolls, then brushed with a buttery topping that takes them right over the top.
And while I wouldn’t call a cheeseburger “health food,” I will say this recipe is practical, portion-friendly, and easy to balance with a crisp salad, fruit tray, or veggie platter. That’s one of the reasons I love serving these party sliders for gatherings. They satisfy everybody, from hungry teens to picky adults, and they don’t make a big mess.
If you’ve been searching for easy sliders, ground beef sliders, or a simple cheeseburger recipe you can count on, you’re in exactly the right place.
Why you’ll love this recipe
- Ready in about 30 minutes from start to finish
- Bakes all at once—no flipping individual burgers
- Perfect for parties, potlucks, and game day sliders spreads
- Great for feeding a crowd without a lot of fuss
- Made with simple grocery-store ingredients
- Easy to customize with your favorite burger toppings
- Soft, melty, savory, and incredibly satisfying
- Works as dinner, lunch, or appetizer sliders
- Make-ahead friendly for busy days
- Kid-approved and grown-up approved too
Ingredients
Here’s what you’ll need for this Cheeseburger Sliders Recipe:
- 1 tablespoon olive oil
- 1 small yellow onion, finely diced
(Yellow onion gives the best mellow sweetness, but white onion works too.) - 1 1/2 pounds ground beef, 85/15 or 90/10
(I like 85/15 for juicy beef sliders, but 90/10 is a little leaner and still works well.) - 1 teaspoon kosher salt
- 1/2 teaspoon black pepper
- 1 teaspoon garlic powder
- 1 teaspoon Worcestershire sauce
(This adds that classic burger-shop flavor.) - 12 slider buns or 1 package Hawaiian rolls
(Soft rolls are ideal for slider sandwiches; King’s Hawaiian or store-brand sweet rolls both work.) - 8 slices cheddar cheese, cut to fit
(Sharp cheddar gives more flavor, but American cheese melts beautifully too.) - 2 tablespoons dill pickle slices, chopped or left whole
(Optional, but highly recommended if you like that classic burger tang.) - 2 tablespoons ketchup
- 1 tablespoon yellow mustard
For the buttery topping:
- 2 tablespoons unsalted butter, melted
- 1 teaspoon sesame seeds
(Optional, but they make the tops feel more like a real burger bun.) - 1/2 teaspoon onion powder
- 1/2 teaspoon garlic powder

A few ingredient notes from my kitchen: don’t overwork the beef, and don’t skip draining excess grease if your meat runs fatty. That one small step keeps your hamburger sliders from getting soggy on the bottom. And if you’re serving these for a party, use cheese that melts fast and evenly. Good old deli-sliced cheddar or American really shines here.
Directions
-
Preheat the oven and prep the pan.
Set your oven to 350°F. Lightly grease a 9×13-inch baking dish or line it with parchment for easier cleanup. If you know you’re serving these at a party, a baking dish helps keep the cheesy sliders warm a little longer. -
Cook the onions first.
Heat the olive oil in a large skillet over medium heat. Add the diced onion and cook for 3 to 4 minutes, stirring now and then, until softened and lightly golden. This little step builds flavor and takes the raw edge off the onions. -
Brown the beef.
Add the ground beef to the skillet with the onions. Sprinkle in the salt, pepper, and garlic powder, then cook until the beef is browned and no pink remains, about 6 to 8 minutes. Break it up with a wooden spoon into small crumbles so the filling fits neatly into the rolls. -
Season and drain.
Stir in the Worcestershire sauce. If there’s excess grease in the pan, drain it off carefully. This matters more than people think—too much grease can make your baked sliders heavy instead of nicely balanced. -
Slice the rolls as one slab.
Without pulling the rolls apart, slice the entire sheet of buns in half horizontally. Place the bottom half in the prepared baking dish. Keeping the rolls connected makes assembly much easier, and it helps the sliders hold together beautifully. -
Layer on the flavor.
Spread the cooked beef mixture evenly over the bottom buns. Drizzle or lightly spread the ketchup and mustard across the beef. Add the pickle slices if using, then top everything with the cheese slices, covering as much surface area as you can. -
Add the tops.
Place the top half of the rolls over the cheese. Press down very gently—just enough to settle everything in place. You don’t want to squash them flat. -
Brush with buttery topping.
In a small bowl, mix the melted butter, sesame seeds, onion powder, and garlic powder. Brush this mixture all over the tops of the buns. This gives the sliders shine, flavor, and that lovely diner-style finish. -
Bake until hot and melty.
Cover loosely with foil and bake for 10 minutes. Then uncover and bake 5 to 8 minutes more, until the cheese is fully melted and the tops are lightly golden. If your oven runs cool, give them another minute or two, but keep an eye on them. -
Rest, slice, and serve.
Let the sliders rest for 3 to 5 minutes before cutting. Use a sharp knife to separate into individual sliders. Serve warm with extra pickles, ketchup, mustard, or a side of crispy oven fries.
Servings & Timing
- Yield: 12 sliders
- Prep Time: 15 minutes
- Cook Time: 15 minutes
- Rest Time: 5 minutes
- Total Time: 35 minutes
That timing makes this one of my favorite easy sliders recipes for busy weeknights. You can have dinner on the table in well under an hour, which is always a win in my book.
Variations
- Bacon cheeseburger sliders: Add crumbled cooked bacon between the beef and cheese.
- Spicy sliders: Mix diced jalapeños into the beef or use pepper jack cheese.
- Mushroom Swiss version: Swap cheddar for Swiss and add sautéed mushrooms.
- Big Mac-style sliders: Add shredded lettuce after baking and use a quick burger sauce.
- Turkey sliders: Use ground turkey instead of beef and add a little extra Worcestershire for richness.
- Low-carb burger sliders: Skip the buns and bake the filling in lettuce cups or serve over roasted vegetables.
These little twists are especially handy if you want one base recipe that can please different tastes at the same table.
Storage & Reheating
Store leftover mini cheeseburgers in an airtight container in the refrigerator for up to 3 days. For best texture, keep them in a single layer or place parchment between layers so the tops don’t get damp.
To reheat, place the sliders in a 325°F oven for about 10 minutes, loosely covered with foil. You can also microwave them for 30 to 45 seconds, but the oven keeps the buns softer and the tops from turning chewy.
For freezing, wrap individual sliders in foil and place them in a freezer-safe bag for up to 2 months. Thaw overnight in the refrigerator, then warm in the oven until heated through.
If you want to make them ahead, cook the beef mixture a day in advance and refrigerate it. Then assemble and bake when you’re ready. That’s a real lifesaver for party prep, especially when you already have enough going on.
Notes
This recipe got better and better as I tested it. The first time around, I piled the beef on too thick and used too much sauce. Tasty? Yes. A little messy? Also yes. The sweet spot is a nice even layer of meat and just enough ketchup and mustard to give that burger flavor without soaking the buns.
A few more tips I’ve learned:
- Finely diced onions blend into the filling better than big chunks.
- Shredded cheese works in a pinch, but sliced cheese gives a more even melt.
- Letting the sliders rest for a few minutes before slicing makes them much easier to serve.
- If you’re making appetizer sliders for a party, cut them a little smaller and secure each one with a toothpick.
- For a more diner-style finish, brush the tops twice—once before baking and once right as they come out of the oven.
And one more thing: if you’re serving a crowd, make a double batch. I say that with complete confidence because these disappear fast. Faster than you’d think, honestly.
FAQs
Can I make this Cheeseburger Sliders Recipe ahead of time?
Yes. Cook the beef mixture up to a day ahead, refrigerate it, and assemble the sliders just before baking.
What’s the best cheese for cheeseburger sliders?
Cheddar and American are both excellent. Cheddar gives more sharp flavor, while American melts extra smooth.
Can I use ground turkey instead of ground beef?
Absolutely. Ground turkey works well, though it’s a bit leaner, so add a splash of Worcestershire or a little extra seasoning for flavor.
How do I keep the bottoms from getting soggy?
Drain the beef well, don’t overdo the sauces, and bake uncovered at the end so excess moisture can cook off.
Are these good for game day?
They’re ideal for it. These game day sliders are easy to make in batches, easy to serve, and easy to eat while people are mingling around the TV.
Can I add more toppings?
Sure can. Cooked bacon, pickles, sautéed mushrooms, jalapeños, and even a little burger sauce all work nicely.
What kind of rolls should I use?
Soft slider buns or Hawaiian rolls are the easiest and most reliable. They hold together well and bake up tender.
Can I freeze baked sliders?
Yes. Wrap them well and freeze for up to 2 months. Reheat in the oven for the best texture.
A few serving ideas that make this meal feel complete
If you’re making these ground beef sliders for dinner, pair them with oven fries, sweet potato wedges, coleslaw, pasta salad, or a crunchy chopped salad. For parties, I like setting them out with pickle spears, kettle chips, and a few dipping sauces—mustard, ranch, and a simple burger sauce made from mayo, ketchup, and relish.
And if you’re planning a casual spread, these work beautifully beside other finger foods. Think baked wings, veggie trays, deviled eggs, or a pan of brownies for dessert. It’s that kind of food table—warm, familiar, and impossible to resist.
If you have related recipes on your site, this is a great place to link readers to homemade fries, burger sauce, onion rings, or a simple macaroni salad. It keeps your menu feeling connected and helpful, which readers appreciate and search engines notice too.
Conclusion
This Cheeseburger Sliders Recipe is simple, comforting, and perfect for everything from weeknight dinners to holiday parties and casual get-togethers. With juicy beef, melty cheese, soft buns, and plenty of classic burger flavor, these beef sliders are the kind of recipe people ask for again and again.
Give them a try the next time you need a dependable crowd-pleaser, and if you do, I’d love to hear how they turned out. Leave a comment, share your favorite variation, and don’t forget to check out more party sliders and family-friendly dinner recipes while you’re here.