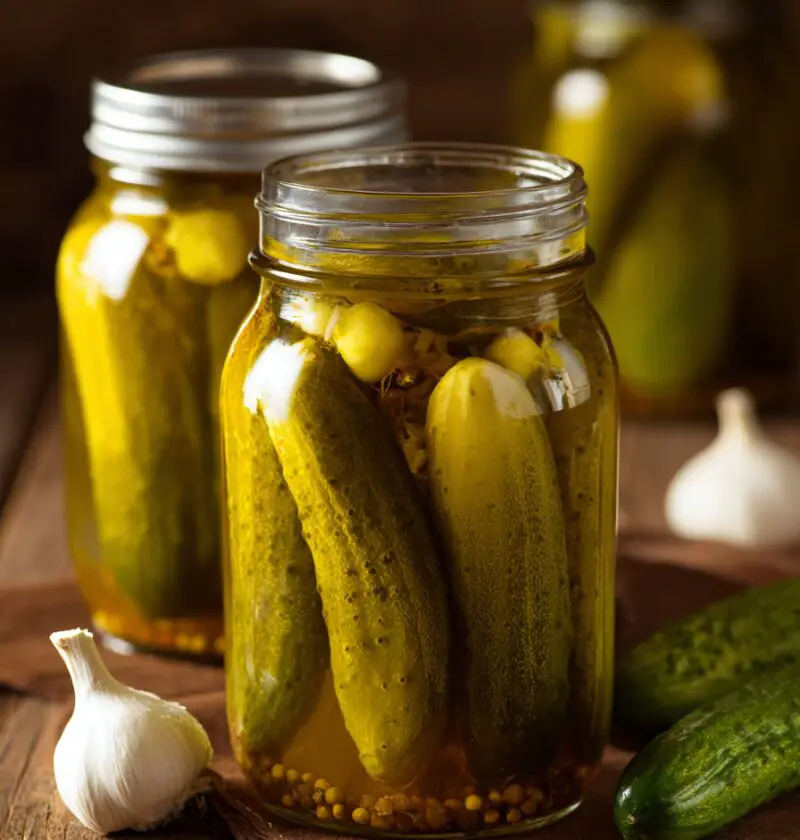
Canned Dill Pickle Recipe
If you’ve been craving a classic, crunchy, old-fashioned Canned Dill Pickle Recipe that tastes like something your grandma might’ve kept on her pantry shelf, you’re in the right place. This homemade dill pickle recipe uses a simple vinegar pickling brine, is perfect for water bath canning, and gives you crisp, garlicky, shelf stable pickles you can enjoy all year long.
I’ve been canning dill pickles since my kids were little and snacking straight out of the jar after school. Over the years, I’ve tested more dill pickle canning recipes than I care to admit—some too salty, some too soft, some too “meh.” This one? It checks all the boxes for crunchy dill pickles, a bright, tangy dill and garlic brine, and a method that’s reliable but not fussy. It’s a pantry staple in our house and one of my favorite ways of preserving cucumbers at the peak of summer.
Whether you’re a canning newbie or you’ve got a basement full of jars already, this Canned Dill Pickle Recipe will walk you through everything step-by-step—brine, jars, timing, and all the little tips that actually make a difference.
Why You’ll Love This Recipe
- Crunchy every time – The method here focuses on texture, so you don’t end up with sad, mushy pickles.
- Simple pantry ingredients – Just vinegar, water, salt, dill, garlic, and spices—nothing weird or hard to find.
- Water bath canning friendly – No pressure canner needed; a big stock pot and a rack are plenty.
- Great for beginners – Clear directions, gentle hand-holding, and lots of little tips built in.
- Naturally gluten-free and vegan – These homemade canned pickles fit most dietary needs without any tweaks.
- Flexible flavor – You can easily make them spicier, more garlicky, or more “classic deli” style.
- Long-lasting pantry staple – Properly processed, these shelf stable pickles keep for a year (and usually get better with time).
- Perfect for gifting – A pretty jar of homemade dill pickles is always a hit at barbecues, holidays, or housewarmings.
- Budget-friendly preserving – Peak-season pickling cucumbers are often cheap in bulk, so you stretch your dollar.
Ingredients
For this Canned Dill Pickle Recipe, you’ll need enough to fill about 6 pint jars (or 3 quart jars), depending on how tightly you pack your cucumbers.
For the pickles:
- 4 pounds pickling cucumbers, 3–4 inches long (Kirby cucumbers or other “pickling” varieties; look for firm, bumpy skin)
- 6–8 cloves garlic, peeled and lightly smashed (more if you like very garlicky dill pickles)
- 6 heads fresh dill (or 2–3 teaspoons dill seeds per jar if you can’t find fresh)
- 1–2 teaspoons black peppercorns (divide among jars)
- 1–2 teaspoons mustard seeds (optional, for extra classic deli flavor)
- ½–1 teaspoon red pepper flakes (optional, for a gentle heat)
For the dill pickle brine (vinegar and salt brine):
- 4 cups water (non-chlorinated if possible; filtered or bottled is best for crunch)
- 4 cups distilled white vinegar, 5% acidity (this acidity level is important for safety)
- ½ cup pickling salt (or canning salt; do NOT use iodized table salt—it can make the brine cloudy)
- 2 teaspoons granulated sugar (optional, but helps round out the flavor without making them “sweet pickles”)
Equipment you’ll need:
- 6 clean pint canning jars with new lids and bands (Ball or Kerr are easy to find in the U.S.)
- Large pot for water bath canning (deep enough to cover jars by at least 1–2 inches)
- Jar lifter (worth every penny for safety)
- Funnel (a canning funnel makes filling jars much easier)
- Bubble remover or a thin spatula (to release trapped air)
- Clean kitchen towels and a ladle
Ingredient tips:
– Use small, fresh, firm cucumbers—within 24 hours of picking if you can. The fresher the cucumber, the crunchier the finished dill pickle.
– If your cucumbers are a little soft or “bendy,” save them for relish; they won’t magically get crisp in the jar.
– White vinegar gives that classic dill pickle tang and clear brine. You can substitute up to half with apple cider vinegar (still 5% acidity) for a slightly deeper flavor, but the color will be a bit golden.
Directions

1. Prep your jars and canning pot.
Wash your jars, lids, and bands in hot, soapy water, then rinse well. Place the jars upright in a large canning pot or deep stockpot, cover with water, and bring to a gentle simmer while you prep everything else (this keeps them hot and clean). Keep the lids in a small pan of very hot (not boiling) water off to the side.
2. Wash and trim the cucumbers.
Rinse the pickling cucumbers under cool water and scrub gently to remove any dirt or prickles. Slice off 1/16–1/8 inch from the blossom end of each cucumber (the end opposite the stem)—the blossom end has enzymes that can soften pickles, so trimming it helps keep them crunchy. You can leave the stem end on, or trim it too for a cleaner look.
3. Cut cucumbers into spears or rounds.
Decide what kind of homemade dill pickles you want:
- For spears: Cut each cucumber lengthwise into 4–6 wedges.
- For chips: Slice crosswise into ¼-inch rounds.
Spears tend to stay a little crisper in my experience, but chips are great for burgers and sandwiches. You can mix and match in different jars.
4. Make the vinegar pickling brine.
In a medium pot, combine water, vinegar, pickling salt, and sugar (if using). Bring to a gentle boil over medium-high heat, stirring until the salt dissolves completely. Once it comes to a boil and the salt is fully dissolved, reduce the heat to low and keep the dill pickle brine hot—but not boiling hard—while you pack the jars.
5. Pack the jars with seasonings and cucumbers.
Using a jar lifter, carefully remove one hot jar from the pot, pouring the water back into the pot. Place the jar on a folded kitchen towel. Add to the bottom of each pint jar:
- 1 head fresh dill (or ½ teaspoon dill seeds)
- 1 lightly smashed garlic clove (or 2, if you love garlic dill pickles)
- A pinch of peppercorns, mustard seeds, and red pepper flakes, if using
Now pack the jar firmly with cucumbers—spears standing upright or chips stacked fairly tightly. Leave about ½ inch of headspace at the top. You want them snug so they don’t float, but not so crammed that brine can’t move around.
6. Add the hot brine.
Using a ladle and canning funnel, pour the hot vinegar and salt brine over the cucumbers, still leaving ½ inch headspace at the top. Work slowly so the brine can flow down around the cucumbers, and tap the jar gently on the towel to help it settle.
7. Remove air bubbles and adjust headspace.
Slide a bubble remover or a thin plastic spatula down the sides of the jar to release any trapped air. Add a little extra brine if needed to reach that ½-inch headspace again. This helps ensure safe processing and good sealing.
8. Wipe the rims and apply lids.
Wipe the jar rim with a clean, damp cloth to remove any salt or brine. Place a warm lid centered on the jar and screw on the band until fingertip-tight (snug, but not cranked down as hard as you can).
9. Process in a boiling water bath.
Place the filled jar back into the canning pot. Repeat the packing process with the remaining jars until your cucumbers, brine, and jars are used. Make sure the jars are covered by at least 1–2 inches of water. Bring the pot to a full, rolling boil, then process:
- Pint jars: 10 minutes
- Quart jars: 15 minutes
Start timing once the water returns to a full boil. Adjust for altitude if needed (above 1,000 feet, you’ll usually add 5–10 minutes—check a trusted source like the National Center for Home Food Preservation).
10. Cool and test the seals.
After processing, turn off the heat and let jars rest in the hot water for 5 minutes. Carefully lift jars straight up with the jar lifter and set them on a towel-lined counter. Don’t tilt or shake them. Let them cool undisturbed for 12–24 hours. You’ll likely hear that happy “ping” as they seal. Once cool, check the lids—if the center doesn’t flex up and down when pressed, it’s sealed.
11. Label and let the flavors develop.
Remove the bands (this helps prevent rust and makes it easier to see if a seal fails later), wipe the jars if needed, and label with the date. For the best flavor, let your homemade canned pickles sit in a cool, dark pantry for at least 1–2 weeks before opening. I know that’s the hard part—but they really do improve as the dill and garlic brine mellows and infuses the cucumbers.
Servings & Timing
- Yield: About 6 pint jars (or 3 quart jars) of canned dill pickles
- Prep Time: 30–40 minutes (washing, trimming, packing jars)
- Cook/Processing Time: 20–25 minutes (including brine prep and water bath canning time)
- Total Time: About 1 hour–1 hour 15 minutes, plus 12–24 hours cooling and at least 1–2 weeks for best flavor
I like to call this a “Saturday afternoon project” recipe—enough effort to feel satisfying, but not so much that you’re exhausted.
Variations
You know what? Once you’ve made this basic canning pickle recipe, it’s very easy to play around a bit while staying safe and within tested guidelines.
- Spicy Garlic Dill Pickles: Add extra garlic and ¼–½ teaspoon red pepper flakes per jar for a good kick.
- Half-Sour Style: Use the same seasonings but cut the processing time in half and store in the fridge; they’ll be crisper and a bit more “fresh cucumber” tasting.
- Dill Pickle Chips with Onion: Add a few thin slices of sweet onion to each jar for a flavor reminiscent of deli pickle trays.
- “Sandwich Stackers”: Slice cucumbers lengthwise into thin planks instead of spears for easy sandwich layering.
- Mixed Garden Pickles: Tuck in a few carrot sticks or cauliflower florets along with the cucumbers for a colorful jar (keep the same brine and processing time).
- Lower-Sodium Brine: You can gently reduce the salt to ⅓ cup for a less salty pickle, but don’t go much lower or you’ll sacrifice both flavor and texture.
Storage & Reheating
Well, we’re not exactly reheating pickles—but here’s how to store them so they stay at their best.
- Shelf storage: Store sealed jars of canned dill pickles in a cool, dark place (pantry, basement, or cupboard away from the stove). Properly processed and sealed jars are good for up to 1 year, though the flavor is best within 6–9 months.
- After opening: Once you open a jar, store it in the refrigerator with the pickles fully submerged in the brine. Use within 1–2 months for best crunch and taste.
- Make-ahead: This recipe is literally made for planning ahead—can in summer, enjoy during football season, holidays, and beyond. I like to set aside one “gift stash” case of jars specifically for sharing.
- Do not freeze: Freezing will ruin the texture; the cucumbers will turn soft and watery. Stick to cool pantry + fridge storage.
Notes
A few personal tips from many, many batches of homemade dill pickles over the last 30 years:
- Crunch matters: The two biggest game-changers for crunchy dill pickles are (1) very fresh pickling cucumbers and (2) trimming the blossom ends. Everything else helps, but those two are essential.
- Don’t reduce the vinegar: The vinegar-to-water ratio in this dill pickle canning recipe gives you that safe acidity level and tang. You can change spices, but don’t reduce the vinegar.
- Cloudy brine: If you use iodized salt or some anti-caking table salts, your brine can look cloudy. That doesn’t always mean it’s unsafe—but it’s not as pretty. That’s why pickling salt is strongly recommended.
- Batch scaling: If you’re swimming in cucumbers (maybe you got excited at the farmers’ market—no judgment), you can scale the brine up or down. Just keep the 1:1 ratio of water to vinegar and the same salt concentration.
- Use the leftover brine: Once you’ve eaten the pickles, don’t toss that dill and garlic brine right away. It makes a great marinade base for chicken, a zingy addition to potato salad, or a splash in Bloody Marys.
FAQs
1. Can I use regular cucumbers instead of pickling cucumbers?
You can, but they often turn softer and less crunchy. Thick-skinned, waxed “salad” cucumbers don’t absorb brine as nicely and may get a bit flabby.
2. How long do I have to wait before eating the pickles?
Technically you can eat them after a few days, but give them at least 1–2 weeks for the flavors to fully develop. By four weeks, the dill and garlic brine usually tastes perfect.
3. Why did my pickles turn soft?
Common causes are older cucumbers, not trimming the blossom end, over-processing (too long in the boiling water), or using cucumbers that sat in the fridge for days before canning.
4. Can I change the type of vinegar?
You can use distilled white vinegar or 5% apple cider vinegar. Don’t use homemade vinegar or lower-acidity kinds—they’re not safe for water bath canning in this recipe.
5. My jars didn’t seal. What should I do?
If a jar doesn’t seal after 24 hours, store it in the fridge and eat those pickles within a couple of weeks. Don’t try to reprocess the same jar repeatedly; the texture will suffer.
6. Can I cut the salt in half for low-sodium pickles?
You can reduce it slightly (to about ⅓ cup), but going much lower can affect both safety and crunch. They’ll also taste flat. For strict low-sodium needs, refrigerated “quick pickles” might be a better route.
7. Is it safe to add more garlic and spices?
Yes—adding more spices and garlic is safe. Just don’t reduce the vinegar or increase the water. Seasonings don’t affect acidity the way the brine does.
8. Do I really need a water bath canner?
You don’t need a specialty canner. Any deep, heavy pot with a rack or folded towel at the bottom to keep jars off direct heat will work, as long as you can cover jars with 1–2 inches of boiling water.
Conclusion
This Canned Dill Pickle Recipe is everything I love about old-fashioned home preserving: simple ingredients, that satisfying “ping” of sealing jars, and a pantry full of crunchy dill pickles waiting for burgers, charcuterie boards, or just late-night snacking straight from the jar.
If you try this recipe, I’d love to hear how your batch turns out—do you like spears or chips, extra garlic or just a hint? Leave a comment, share your tweaks, and if you’re hooked on preserving cucumbers now, go explore more canning recipes next. There’s a whole little world of homemade pantry goodness waiting.
Canned Dill Pickle Recipe
Ingredients
- 4 pounds pickling cucumbers 3–4 inches long (Kirby or other pickling varieties; firm, bumpy skin)
- 6 to 8 garlic cloves peeled and lightly smashed
- 6 heads fresh dill or use dill seed as below
- dill seeds 2–3 teaspoons per jar if you can’t find fresh dill
- 1 to 2 teaspoons black peppercorns divide among jars
- 1 to 2 teaspoons mustard seeds optional, for extra classic deli flavor; divide among jars
- 1/2 to 1 teaspoon red pepper flakes optional, for gentle heat; divide among jars
- 4 cups water non-chlorinated if possible (filtered or bottled for best crunch)
- 4 cups distilled white vinegar 5% acidity; can substitute up to half with 5% apple cider vinegar
- 1/2 cup pickling salt or canning salt; do not use iodized table salt
- 2 teaspoons granulated sugar optional; rounds out flavor without making sweet pickles
- 6 pint canning jars with lids and bands or 3 quart jars; washed and clean
Instructions
- Wash jars, lids, and bands in hot, soapy water and rinse well. Place jars upright in a large canning pot or deep stockpot, cover with water, and bring to a gentle simmer to keep them hot and clean. Keep lids in a small pan of very hot (not boiling) water off to the side.
- Rinse pickling cucumbers under cool water and scrub gently to remove any dirt or prickles. Slice off 1/16–1/8 inch from the blossom end of each cucumber (the end opposite the stem) to remove softening enzymes. Trim stem ends if desired.
- Decide on spears or chips. For spears: cut each cucumber lengthwise into 4–6 wedges. For chips: slice crosswise into 1/4-inch rounds. You can mix and match in different jars.
- In a medium pot, combine water, distilled white vinegar, pickling salt, and granulated sugar (if using). Bring to a gentle boil over medium-high heat, stirring until the salt dissolves completely. Once it reaches a boil and the salt is dissolved, reduce heat to low and keep the brine hot but not at a hard boil.
- Using a jar lifter, remove one hot jar from the canning pot, pouring the water back into the pot. Place the jar on a folded kitchen towel. Add to the bottom of each pint jar: 1 head fresh dill (or about 1/2 teaspoon dill seeds), 1 lightly smashed garlic clove (or 2 for extra garlicky pickles), and a pinch of black peppercorns, mustard seeds, and red pepper flakes if using. Pack the jar firmly with cucumber spears standing upright or chips stacked tightly, leaving about 1/2 inch headspace at the top.
- Using a ladle and canning funnel, pour the hot brine over the cucumbers, maintaining 1/2 inch headspace at the top. Pour slowly so the brine can flow around the cucumbers and tap the jar gently on the towel to help it settle.
- Slide a bubble remover or thin plastic spatula down the inside of the jar to release any trapped air bubbles. Add more brine if needed to restore 1/2 inch headspace.
- Wipe the jar rim with a clean, damp cloth to remove any brine or salt. Place a warm lid on the jar and screw on the band until fingertip-tight (snug but not overly tight).
- Place the filled jar back into the canning pot. Repeat packing and filling with remaining jars, cucumbers, and brine. Ensure jars are covered by 1–2 inches of water. Bring to a full rolling boil, then process pint jars for 10 minutes (quart jars for 15 minutes), starting timing once the water returns to a full boil. Adjust processing time for altitude according to trusted guidelines if above 1,000 feet.
- Turn off heat and let jars rest in the hot water for 5 minutes. Using a jar lifter, carefully lift jars straight up and set them on a towel-lined counter without tilting. Let cool undisturbed for 12–24 hours. Once cool, check seals: the center of each lid should be concave and not flex up and down when pressed.
- Remove bands, wipe jars if needed, and label with the date. Store sealed jars in a cool, dark place. For best flavor, let pickles sit for at least 1–2 weeks before opening so the dill and garlic can fully infuse the cucumbers.