Butterfinger Cake Recipe
If you love candy bars, caramel, and chocolate all wrapped up in one ridiculously easy dessert, this Butterfinger Cake Recipe is about to become your new potluck superstar.
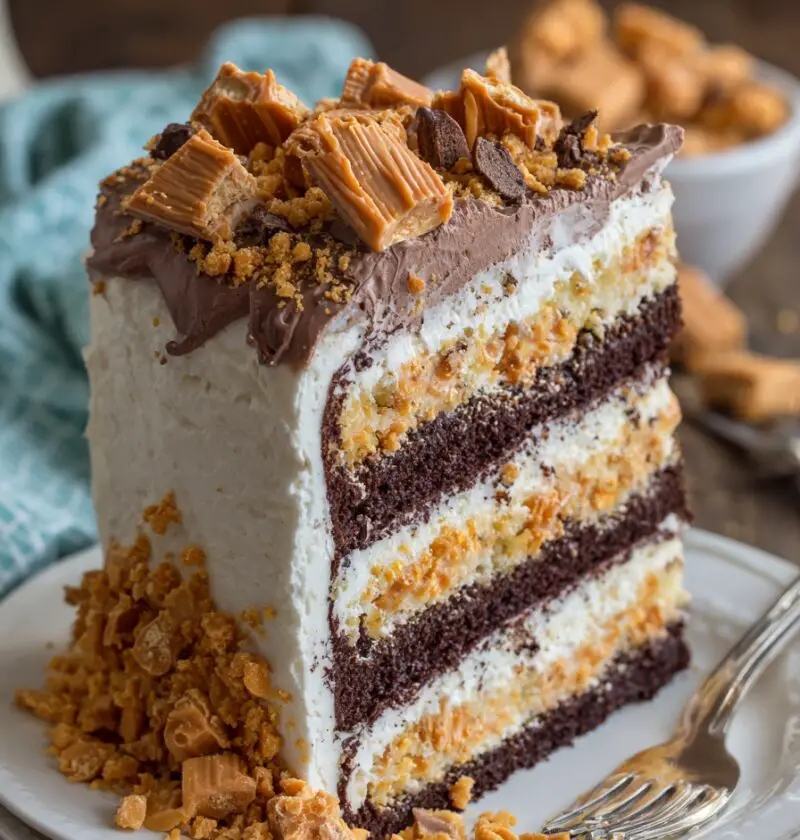
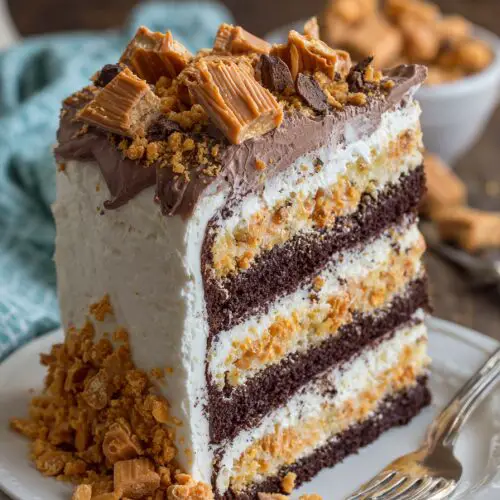
This butterfinger cake is a classic poke cake dessert: a soft yellow cake soaked with sweet caramel sauce, topped with fluffy Cool Whip and a generous layer of crushed Butterfinger candy bars. It’s the kind of chocolate candy dessert cake that people remember—and ask for—weeks after the party. I like to call it my “don’t-even-think-about-bringing-home-leftovers” party potluck cake, because there’s never a crumb left in the pan.
I first started making this creamy caramel cake in the early 2000s, when poke cakes were having a big moment again at church suppers and office parties. As a busy mom juggling work, kids’ activities, and a very full calendar, I leaned hard on semi-homemade recipes. This easy butterfinger dessert is built on a simple yellow cake mix recipe, dressed up with caramel, chocolate, and that famous Butterfinger crunch. It’s not health food, of course—but it is joy food, and honestly, there’s plenty of room for that at my table.
Now I pull this refrigerated poke cake out for birthdays, game days, and any gathering where I want zero stress and maximum smiles. It’s chilled, creamy, and a little bit nostalgic—like the candy bar cakes our moms and grandmas used to make, but with a tiny modern twist.
Why You’ll Love This Recipe
- Ridiculously easy: Starts with a boxed yellow cake mix, so you’re mostly stirring, poking, and pouring—not fussing.
- Crowd-approved flavor: That combo of caramel, chocolate, and crushed Butterfinger topping makes this a guaranteed hit.
- Perfect make-ahead dessert: This refrigerated poke cake actually tastes better after chilling, so you can prep it the day before.
- Great for parties and potlucks: Travels well in a 9×13 pan and slices cleanly, so it’s ideal for big gatherings, game nights, and family reunions.
- Kid- and grown-up friendly: It’s a candy bar cake, but the soft cake and cool whip frosting layer keep it light and easy to eat.
- Flexible and forgiving: You can swap toppings, use different candy bars, or tweak the sauce and it still turns out delicious.
- Budget-friendly treat: Most ingredients are pantry staples, and you can watch for sales on candy bars and baking mixes.
- No fancy tools needed: If you’ve got a baking pan, a wooden spoon, and a mixing bowl, you’re good to go.
Ingredients
Here’s everything you’ll need to make this chocolate Butterfinger cake with caramel and whipped topping. I’ll list the basics first, then share a few helpful tips.
For the Cake:
- 1 box yellow cake mix (15.25 oz; any brand you like)
- Ingredients listed on the cake mix box
- Usually: 3 large eggs
- 1/2 cup vegetable oil (or canola oil)
- 1 cup water (or use 1/2 cup milk + 1/2 cup water for a slightly richer cake)
For the Caramel & Chocolate “Poke” Layer:
- 1 cup caramel sauce or caramel ice cream topping (jarred or bottled; I often use Smucker’s)
- 1 can sweetened condensed milk (14 oz)
- 1/2 cup chocolate syrup (like Hershey’s; regular or dark chocolate both work)
For the Topping:
- 1 tub frozen whipped topping, thawed (8 oz Cool Whip or store brand)
- 6–8 full-size Butterfinger candy bars, crushed (about 2 to 2 1/2 cups loosely packed)
Ingredient Tips:
- Yellow cake mix: A classic yellow cake mix gives that nostalgic flavor, but you can use white or even a butter cake mix for a richer base.
- Caramel sauce: Thicker caramel ice cream topping works best because it clings to the cake. If your caramel is very thick, warm it slightly in the microwave so it pours easily.
- Sweetened condensed milk: This is the “soaking” magic that turns a simple cake into a creamy caramel cake. Don’t confuse it with evaporated milk—they’re very different.
- Whipped topping: Let it thaw in the fridge until scoopable but still cool. If you prefer real whipped cream, you can use that, but whipped topping holds better over a couple of days.
- Butterfinger bars: Crunch them while they’re still in the wrapper using a rolling pin or the flat side of a meat mallet. A few larger chunks mixed with crumbs give a great texture on top.

Directions
-
Preheat and prep the pan.
Heat your oven to the temperature on the yellow cake mix box (usually 350°F). Grease a 9×13-inch baking pan with nonstick spray or a thin layer of butter, making sure to get the corners. -
Mix the cake batter.
In a large mixing bowl, combine the cake mix, eggs, oil, and water (or water/milk mix). Beat with an electric mixer on medium speed for about 2 minutes, scraping down the sides once. The batter should be smooth and slightly thick. -
Bake the cake.
Pour the batter into your prepared pan and spread it evenly. Bake according to the package directions (usually 25–30 minutes), or until the top is golden and a toothpick inserted in the center comes out clean or with a few moist crumbs. -
Prepare the caramel mixture.
While the cake bakes, stir together the caramel sauce and sweetened condensed milk in a medium bowl. It’ll be thick and glossy—this is what makes that creamy, sweet center in your poke cake dessert. -
Poke holes in the warm cake.
When the cake is done, let it cool for about 5–10 minutes, just until it’s no longer bubbling hot. Using the handle of a wooden spoon, a chopstick, or even a thick straw, poke holes all over the cake, spacing them about 1 inch apart. Go almost all the way to the bottom, but don’t worry if you hit the pan. -
Pour on the caramel mixture.
Slowly pour the caramel-sweetened condensed milk mixture over the warm cake, paying attention to get some into each hole. Use a spatula to gently nudge it across the top so it seeps in. It may look like a lot of liquid, but the cake will soak it up as it rests. -
Drizzle with chocolate syrup.
Drizzle the chocolate syrup evenly over the top. You don’t need to drench it, just a nice zig-zag pattern. This layer gives that chocolate butterfinger cake flavor without making the cake heavy. -
Cool and chill the cake.
Let the cake cool to room temperature on the counter. Once it’s cooled, cover it with plastic wrap or foil and chill in the refrigerator for at least 2 hours, preferably 4 hours or overnight. This rest time is what turns it into a soft, refrigerated poke cake. -
Add the Cool Whip frosting layer.
When you’re ready to finish the cake, spread the thawed whipped topping evenly over the chilled cake. This becomes your fluffy cool whip frosting cake layer. Smooth the top with a spatula. -
Top with crushed Butterfingers.
Sprinkle the crushed Butterfinger candy bars generously over the whipped topping. Press very lightly so they stick, but don’t smash the topping. If you like extra crunch, you can hold back a bit of the candy and add a little more right before serving. -
Chill again, then serve.
Cover and chill the finished butterfinger candy dessert for at least 30 minutes before serving. Slice into squares and serve cold. You’ll notice the layers hold nicely, and every bite is soft, creamy, and crunchy all at once.
Servings & Timing
- Yield: About 12–16 servings (depending on how big you slice your pieces)
- Prep Time: 15–20 minutes (mixing, baking prep, and topping prep)
- Bake Time: 25–30 minutes
- Chill Time: Minimum 2–4 hours (overnight gives the best texture)
- Total Time: About 3–5 hours, most of it hands-off while the cake chills and sets
This is one of those desserts that fits nicely into a busy day. You can bake and soak the cake in the morning, chill it while you work or run errands, then add the topping and crushed Butterfinger right before dinner or before you head to a party.
Variations
- Mocha Butterfinger Cake: Use a chocolate cake mix instead of yellow and add 1 teaspoon instant espresso powder to the batter for a deeper coffee-chocolate flavor.
- Peanut Butter Lover’s Version: Swirl 1/2 cup warmed peanut butter into the caramel mixture, and drizzle a little over the top along with the chocolate syrup.
- Lighter “Skinny-ish” Twist: Use a sugar-free cake mix, light caramel sauce, and light whipped topping, and top with fewer Butterfinger pieces (it’s still a treat, just a bit lighter).
- Mini Candy Bar Mix-Up: Replace half of the Butterfinger bars with chopped Snickers or Reese’s cups for a fun mixed candy bar cake.
- Gluten-Free Poke Cake Dessert: Use a gluten-free yellow cake mix and check that your caramel sauce and candies are gluten-free.
- Holiday Party Version: Add red and green sprinkles over the candy topping at Christmas, or orange and black sprinkles for Halloween; it turns into an instant seasonal dessert.
Storage & Reheating
(Though we’re not really reheating this one—it’s meant to be enjoyed cold.)
-
Fridge:
Store the butterfinger cake tightly covered in the refrigerator for up to 4 days. The candy topping will soften a bit over time, but the flavor stays fantastic. -
Freezer:
You can freeze this cake in individual slices. Wrap each piece in plastic wrap, then place in a freezer bag or airtight container. Freeze for up to 2 months. Thaw in the fridge overnight before serving. -
Make-ahead notes:
For the best texture, I like to make the cake and soak it with the caramel mixture the day before, then add the whipped topping and crushed Butterfinger a few hours before serving. This keeps the candy a bit crunchier on top.
Notes
-
Crushing the Butterfingers:
I’ve tried everything from a food processor to a hammer (yes, really) over the years. Honestly, sealing them in a zip-top bag and rolling with a rolling pin gives you the best mix of fine crumbs and bigger pieces. -
Thickness of caramel layer:
If you prefer a slightly less sweet cake, you can hold back 1/4 cup of the caramel or drizzle a thinner layer. My family has a serious sweet tooth, so we go big. -
Preventing a soggy bottom:
Make sure you let the cake cool those 5–10 minutes before poking and soaking. Pouring the caramel-milk mixture over a cake that’s too hot can sometimes make the sides a little mushy. -
Serving for a crowd:
I’ve made this as a party potluck cake for everything from Super Bowl gatherings to church picnics. If you’re serving outside on a hot day, keep it in a cooler or on ice packs until just before dessert so the whipped topping stays firm. -
Flavor balance tip:
A tiny pinch of flaky salt sprinkled over the caramel layer (before chilling) can help balance the sweetness and bring out that “candy bar” taste even more.
FAQs
Can I use a chocolate cake mix instead of yellow?
Yes, you can absolutely use a chocolate cake mix. It turns this into an extra rich chocolate Butterfinger cake, and it’s wonderful if you’re a serious chocolate fan.
Do I have to use Cool Whip, or can I use real whipped cream?
You can use lightly sweetened whipped cream, but it’s less stable. If you go that route, add the whipped cream right before serving and expect leftovers to soften a bit more quickly.
Can I make this Butterfinger cake recipe the night before?
Yes, and I actually recommend it. Making it the night before gives the cake time to soak up the caramel and condensed milk, which makes every bite softer and creamier.
My cake looks too wet—did I ruin it?
Probably not. Poke cakes often look very moist right after the caramel mixture is poured on. Once it chills for several hours, the cake absorbs most of that liquid and the texture settles.
What’s the best way to cut clean slices?
Use a sharp knife and wipe it clean between cuts. Chilling the cake for at least 4 hours (or overnight) also helps each square hold its shape.
Can I use Butterfinger baking bits instead of whole candy bars?
Yes, you can use the bagged Butterfinger bits from the baking aisle. They’re convenient and work well, though I find mixing them with a couple of freshly crushed bars gives a better crunch and flavor.
Is this recipe safe to leave out at room temperature during a party?
It’s fine at room temperature for about 1–2 hours. After that, because of the whipped topping and dairy, it should go back in the fridge.
Can I turn this into cupcakes instead of a 9×13 cake?
Yes, but it’s a bit messier. Bake cupcakes, poke a couple of holes in each, spoon the caramel mixture over, then frost with whipped topping and dip or sprinkle in crushed Butterfinger candy.
Conclusion
This Butterfinger Cake Recipe is the kind of easy dessert that makes hosting feel fun again—simple steps, familiar ingredients, and that big “wow” factor when you pull it out of the fridge. It’s creamy, chocolatey, caramel-soaked, and generously crowned with crushed Butterfinger topping, which checks all the boxes for a candy bar cake that people truly love.
If you give this recipe a try, I’d love to hear how it goes—tell me where you served it, what tweaks you made, or which candy bar you used. And when you’re ready for more easy, crowd-pleasing treats, come back and explore more of my poke cakes and party desserts; there’s always something sweet baking in my kitchen.
Butterfinger Cake
Ingredients
- 1 box yellow cake mix 15.25 oz; any brand
- 3 large eggs or as listed on cake mix box
- 1/2 cup vegetable oil or canola oil; or as listed on cake mix box
- 1 cup water or use 1/2 cup milk + 1/2 cup water for a richer cake
- 1 cup caramel sauce or caramel ice cream topping, such as Smucker’s
- 1 can sweetened condensed milk 14 oz
- 1/2 cup chocolate syrup such as Hershey’s; regular or dark
- 1 tub frozen whipped topping 8 oz; thawed (Cool Whip or store brand)
- 6-8 bars Butterfinger candy bars full-size, crushed (about 2 to 2 1/2 cups loosely packed)
- nonstick cooking spray or butter for greasing the pan
- optional pinch of flaky salt to sprinkle over caramel layer for flavor balance
Instructions
- Preheat your oven to the temperature specified on the yellow cake mix box (usually 350°F/175°C). Grease a 9x13-inch baking pan with nonstick spray or a thin layer of butter, making sure to coat the corners.nonstick cooking spray or butter
- In a large mixing bowl, combine the yellow cake mix, eggs, oil, and water (or water/milk mixture). Beat with an electric mixer on medium speed for about 2 minutes, scraping down the sides once, until the batter is smooth and slightly thick.1 box yellow cake mix, 3 large eggs, 1/2 cup vegetable oil, 1 cup water
- Pour the batter into the prepared 9x13-inch pan and spread it evenly. Bake according to the package directions (usually 25–30 minutes), or until the top is golden and a toothpick inserted in the center comes out clean or with a few moist crumbs.
- While the cake bakes, stir together the caramel sauce and sweetened condensed milk in a medium bowl until smooth and glossy. This will be the mixture that soaks into the poke cake.1 cup caramel sauce, 1 can sweetened condensed milk
- When the cake is done, let it cool for about 5–10 minutes, just until it’s no longer bubbling hot. Using the handle of a wooden spoon, a chopstick, or a thick straw, poke holes all over the cake, spacing them about 1 inch apart and going almost to the bottom of the pan.
- Slowly pour the caramel–sweetened condensed milk mixture evenly over the warm cake, aiming to get some into each hole. Use a spatula to gently nudge it across the top so it seeps in. If using, sprinkle a tiny pinch of flaky salt lightly over the caramel layer to balance the sweetness.1 cup caramel sauce, 1 can sweetened condensed milk, optional pinch of flaky salt
- Drizzle the chocolate syrup evenly over the top of the cake in a zig-zag pattern. You don’t need to drench it; just cover the surface lightly to add chocolate flavor.1/2 cup chocolate syrup
- Let the cake cool completely to room temperature on the counter. Cover the pan with plastic wrap or foil and chill in the refrigerator for at least 2–4 hours, or overnight, until the cake has absorbed the caramel mixture and is well chilled.
- Once the cake is thoroughly chilled, spread the thawed whipped topping evenly over the surface. Smooth the top with a spatula to create an even frosting layer.1 tub frozen whipped topping
- Crush the Butterfinger candy bars (in their wrappers or in a zip-top bag) using a rolling pin or mallet until you have a mix of crumbs and small chunks. Sprinkle the crushed Butterfingers generously over the whipped topping and press very lightly so they adhere without smashing the topping.6-8 bars Butterfinger candy bars
- Cover the cake again and chill for at least 30 minutes before serving. Slice into squares and serve cold. Keep any leftovers covered in the refrigerator.