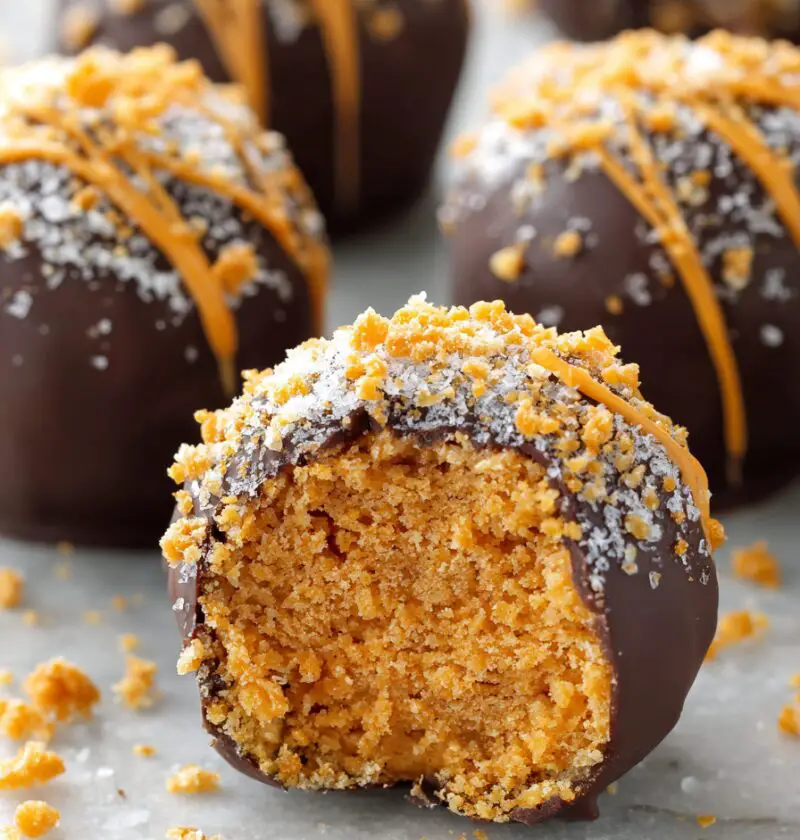
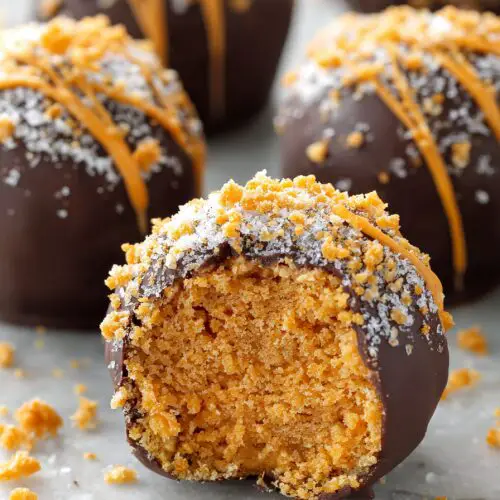
Butterfinger Balls Recipe
If you love rich peanut butter, crunchy candy, and smooth chocolate—but don’t feel like turning on the oven—this Butterfinger Balls Recipe is your new secret weapon for parties, holidays, and “just because” evenings at home.
These no-bake, bite-size candy balls are everything I adore in a treat: quick, fun, and flashy enough for a dessert tray, but simple enough for a Tuesday night. This Butterfinger Balls Recipe is loaded with crushed Butterfinger candies, creamy peanut butter, and a silky chocolate shell. They taste like a cross between a peanut butter truffle and your favorite candy bar—no baking, no fuss, just pure joy.
I started making homemade Butterfinger balls when my kids were teens and their friends would land at my house like hungry birds after school. I needed something fast, fun, and shareable. Over the years, this easy Butterfinger dessert has turned into a holiday tradition and a go-to party dessert bite. It’s especially wonderful at Halloween and Christmas, but honestly, I’ve never seen anyone complain about Butterfinger truffle balls in, say, July.
Why You’ll Love This Butterfinger Balls Recipe
You know what? There are a lot of candy ball recipes out there, but this one really earns a spot in your recipe box:
- No oven needed – This is a true no bake Butterfinger balls recipe, perfect for hot days or busy holidays.
- Quick and simple – About 20 minutes of hands-on time; the rest is just chilling and dipping.
- Amazing texture – Creamy peanut butter center with crunchy bits of crushed Butterfinger candies in every bite.
- Perfect for parties and holidays – These party dessert bites look fancy on a platter but are easy enough for beginners.
- Kid- and teen-friendly – Little hands can help roll the peanut butter Butterfinger balls (and sneak a few).
- Customizable flavors – Swap the chocolate, add sprinkles, or change the candy for endless variations.
- Make-ahead friendly – They freeze beautifully, so you can prep them days or weeks before you need them.
- Budget-conscious – Cheaper than store-bought chocolate truffles or specialty candy, but just as impressive.
- Portion-controlled – Bite size candy balls satisfy a craving without committing to a whole slice of cake.
- Great for gifting – Pack these chocolate covered Butterfinger balls in boxes or tins for neighbors, teachers, or coworkers.
Ingredients
Let’s walk through what you’ll need for this simple candy ball recipe. You can likely find everything at your regular grocery store.
- 1 ½ cups creamy peanut butter (not natural; use Jif or Skippy-style for best texture)
- ½ cup unsalted butter, softened (1 stick, room temperature so it mixes smoothly)
- 2 cups powdered sugar, sifted if lumpy
- 2 cups finely crushed Butterfinger candy bars (about 8 full-size bars or a 10–12 oz bag of Butterfinger baking bits)
- 1 teaspoon pure vanilla extract
- ¼ teaspoon fine sea salt (skip if your butter is salted)
- 2 cups semi-sweet chocolate chips (or chopped bar chocolate)
- 1 tablespoon coconut oil or vegetable shortening (optional, for smoother melting chocolate and a shinier finish)
Optional for topping (choose one or mix and match):
- Extra crushed Butterfinger for sprinkling
- Sea salt flakes
- Festive sprinkles (for holiday candy recipe variations—think orange and black for Halloween, red and green for Christmas)
Ingredient Tips
- Peanut butter: For peanut butter chocolate balls that hold their shape, avoid drippy natural peanut butter. You want that thicker, stabilized store brand.
- Butterfinger bits: You can crush full-size bars in a zip-top bag with a rolling pin, or buy Butterfinger baking bits to save time. Aim for small chunks, not powder.
- Chocolate: Use good-quality chocolate chips or bars. Ghirardelli, Guittard, or even Aldi’s baking chocolate work well.
- Texture balance: If your mixture feels very soft or sticky, you can add a little extra powdered sugar or crushed candy; if it’s too dry, add a spoonful of peanut butter.
Directions
You’ll be surprised how quickly these come together. Here’s the step-by-step, with a few grandma-style tips along the way.
-
Prepare your workspace
Line a baking sheet with parchment paper or a silicone baking mat. This keeps the butterfinger ball treats from sticking and makes clean-up a breeze. -
Beat the peanut butter and butter
In a large mixing bowl, add the softened butter and peanut butter. Use a hand mixer or stand mixer on medium speed and beat until smooth and creamy, about 1–2 minutes. Scrape down the sides of the bowl so everything mixes evenly. -
Add vanilla, salt, and powdered sugar
Pour in the vanilla and salt. Then gradually add the powdered sugar, mixing on low speed to avoid a “sugar cloud.” Once it’s mostly incorporated, increase to medium speed. The mixture should look thick and a little stiff, almost like cookie dough. -
Fold in the crushed Butterfinger candies
Gently stir in the crushed Butterfinger candies with a spatula or wooden spoon. You want them evenly distributed, but don’t overmix—you want those crunchy pockets. The mixture should be firm enough to roll into balls without sticking badly to your hands. -
Chill the mixture briefly (optional but helpful)
If the filling feels too soft or warm, pop the bowl into the fridge for 15–20 minutes. This makes rolling much easier and helps your no bake Butterfinger balls hold their shape. -
Roll into bite-size balls
Using a small cookie scoop or a spoon, portion about 1 tablespoon of mixture per ball. Roll between your palms to form smooth balls and place them on the prepared baking sheet. You should get around 24–28 balls, depending on size. -
Chill until firm
Transfer the tray to the freezer for 20–30 minutes, or the fridge for about 45 minutes, until the butterfinger cookie balls are firm to the touch. This step is key—cold centers are much easier to dip in warm chocolate. -
Melt the chocolate
Place the chocolate chips and coconut oil (if using) in a microwave-safe bowl. Microwave in 20–30 second bursts, stirring well after each, until smooth and fully melted. You can also use a double boiler over gently simmering water. The chocolate should be smooth and fluid, not scorching hot. -
Dip the Butterfinger balls
Working with a few chilled balls at a time, drop one ball into the melted chocolate. Use a fork to roll it gently, then lift it out, letting the excess chocolate drip back into the bowl. You can tap the fork lightly on the bowl’s edge for a thinner coating. Slide the chocolate covered Butterfinger ball back onto the parchment. -
Add toppings while wet
While the chocolate is still soft, sprinkle with extra crushed Butterfinger, sea salt flakes, or sprinkles. If you wait too long, they won’t stick. If you’re decorating a whole batch for a holiday candy recipe, work fairly quickly. -
Chill to set the chocolate
Once all the balls are coated and decorated, return the baking sheet to the fridge for 20–30 minutes, or until the chocolate shell is fully set and firm. -
Serve or store
When the chocolate is set, your homemade Butterfinger balls are ready to enjoy. Transfer them to an airtight container if you’re not serving right away.
Servings & Timing
- Yield: About 24–28 Butterfinger balls (depending on size)
- Prep Time: 20 minutes active time
- Chill Time: 45–60 minutes (between firming the centers and setting the chocolate)
- Total Time: About 1 hour 10 minutes
For parties, I usually plan on 2–3 party dessert bites per person. For my family… well, let’s just say you might want a double batch.
Fun Variations to Try
Here’s the thing: once you’ve made this Butterfinger Balls Recipe once, you’ll probably want to play with it. Here are some of my favorite twists:
- White Chocolate Butterfinger Balls – Dip the chilled centers in melted white chocolate for a sweeter, candy-shop look.
- Dark Chocolate Lovers’ Version – Use 60–70% dark chocolate for a richer, slightly less sweet butterfinger truffle balls experience.
- Crunch Extra: Stir in ½ cup crushed cornflakes or Rice Krispies with the Butterfinger for extra crunch.
- Gluten-Aware Swap: Use gluten-free chocolate and double-check Butterfinger labeling (formulas can change) for a more gluten-conscious treat.
- Mini Candy Bar Mix: Replace half of the Butterfingers with chopped Snickers or Reese’s for a mixed candy ball recipe.
- Holiday Sprinkle Edition: Use themed sprinkles—pastel for Easter, red/white/blue for the Fourth of July, or gold and silver for New Year’s.
Storage & Make-Ahead Tips
One of the reasons I lean on this recipe so often is that it fits real life—busy schedules, parties that sneak up on you, and holidays that somehow arrive faster every year.
- Refrigerator: Store Butterfinger ball treats in an airtight container in the fridge for up to 7 days. Place parchment between layers to prevent sticking.
- Freezer: For longer storage, freeze in a single layer on a baking sheet, then move to a freezer-safe container or bag. They’ll keep well for up to 2 months.
- Thawing: Let frozen butterfinger balls thaw in the fridge for a few hours, or on the counter for 20–30 minutes. They taste best close to room temperature so the centers soften slightly.
- Make-ahead for holidays: I often make a big batch of these no bake Butterfinger balls in early December, freeze them, and then pull out a dozen at a time for cookie trays and gift boxes.
No reheating needed—just thaw and enjoy. Think of them as little frozen treasures waiting in your freezer.
Notes from My Kitchen Tests
I’ve tinkered with this Butterfinger Balls Recipe more than I’d like to admit, and I’ve picked up a few helpful lessons along the way:
- Consistency is everything: If the mixture is too soft, the balls will slump or crack when dipped. A short chill in the fridge usually fixes it.
- Size matters: Golf-ball size looks pretty, but I’ve found 1 tablespoon scoops are the sweet spot—less messy to eat and easier to coat in chocolate.
- Don’t rush the chilling: Skipping or shortening the chill time makes the dipping step messy and frustrating. Colder centers = easier dipping.
- Chocolate temperature: If your melted chocolate gets too thick as it cools, rewarm it in 10–15 second bursts or set the bowl over warm water for a few minutes.
- Taste as you go: Butterfinger candy is sweet, and different brands of peanut butter can vary, so feel free to adjust the powdered sugar slightly to your taste.
- A little crunch on top: My family’s favorite version always has extra crushed Butterfinger sprinkled on top—it gives a little “hint” of what’s inside.
Frequently Asked Questions
1. Can I use natural peanut butter for this recipe?
You can, but the texture will be softer and sometimes greasy. For best results and shape, use a traditional creamy peanut butter like Jif or Skippy.
2. My mixture is too sticky to roll—what should I do?
Chill the mixture for 20–30 minutes, then try again. If it’s still sticky, add 2–4 tablespoons more powdered sugar or crushed Butterfinger candies.
3. How fine should I crush the Butterfinger bars?
Aim for small chunks with some fine crumbs—about the size of small peas or smaller. Too powdery and you lose the crunch; too chunky and the balls won’t roll as smoothly.
4. Can I make these peanut-free?
Yes. You can substitute a thick, creamy sunflower seed butter or soy nut butter, but the flavor will be a bit different. Make sure your candy choice fits your allergy needs as well.
5. Why is my chocolate coating thick and clumpy?
It may have overheated or seized. Adding 1–2 teaspoons of coconut oil or vegetable shortening and reheating gently can help smooth it out.
6. Can I skip the coconut oil or shortening in the chocolate?
Yes, you can. It just helps the chocolate melt more smoothly and gives the shell a shinier finish. Plain melted chocolate still works.
7. Do Butterfinger balls need to stay refrigerated?
For best texture and freshness, yes, keep them in the fridge. You can serve them at room temperature for a couple of hours without any problem.
8. Are these good for gift boxes or cookie exchanges?
They’re perfect for both. These Butterfinger chocolate balls hold up well, pack nicely, and always stand out on a cookie tray.
Conclusion
This Butterfinger Balls Recipe checks all the boxes: quick, no bake, wonderfully nostalgic, and just fancy enough to make people think you fussed much more than you did. The creamy peanut butter, crunchy Butterfinger bits, and smooth chocolate coating hit that peanut butter–chocolate sweet spot every single time.
If you try these homemade Butterfinger balls, let me know how they turn out—leave a comment, share your own twist, or tell me which holiday you served them for. And if you’re as big a fan of easy butterfinger dessert ideas as I am, you might enjoy exploring more peanut butter chocolate balls and no-bake treats next.
Butterfinger Balls
Ingredients
- 1 1/2 cups creamy peanut butter not natural; use a Jif or Skippy-style peanut butter for best texture
- 1/2 cup unsalted butter softened to room temperature
- 2 cups powdered sugar sift if lumpy
- 2 cups finely crushed Butterfinger candy bars about 8 full-size bars or a 10–12 oz bag of Butterfinger baking bits
- 1 teaspoon pure vanilla extract
- 1/4 teaspoon fine sea salt omit if using salted butter
- 2 cups semi-sweet chocolate chips or chopped semi-sweet bar chocolate
- 1 tablespoon coconut oil or vegetable shortening optional, for smoother melted chocolate and a shinier finish
- extra crushed Butterfinger optional, for topping
- sea salt flakes optional, for topping
- festive sprinkles optional, for topping and holiday variations
Instructions
- Line a baking sheet with parchment paper or a silicone baking mat to prevent sticking and make cleanup easier.
- In a large mixing bowl, combine the softened butter and creamy peanut butter. Using a hand mixer or stand mixer on medium speed, beat until smooth and creamy, about 1–2 minutes. Scrape down the sides of the bowl as needed.
- Add the vanilla extract and fine sea salt. Gradually add the powdered sugar, mixing on low speed at first to avoid a sugar cloud. Once mostly incorporated, increase to medium speed and mix until the mixture is thick and slightly stiff, similar to cookie dough.
- Gently fold in the finely crushed Butterfinger candies with a spatula or wooden spoon until evenly distributed. Do not overmix; you want distinct crunchy bits throughout. The mixture should be firm enough to roll without sticking excessively to your hands.
- If the mixture feels too soft or warm, refrigerate the bowl for 15–20 minutes. This will make rolling easier and help the balls hold their shape.
- Using a small cookie scoop or a spoon, portion about 1 tablespoon of mixture per ball. Roll each portion between your palms until smooth and place on the prepared baking sheet. You should end up with about 24–28 balls, depending on size.
- Transfer the baking sheet to the freezer for 20–30 minutes, or to the refrigerator for about 45 minutes, until the centers are firm to the touch. Cold centers are much easier to dip in warm chocolate.
- Place the semi-sweet chocolate chips and coconut oil or shortening (if using) in a microwave-safe bowl. Microwave in 20–30 second bursts, stirring well after each, until the chocolate is smooth and fully melted. Alternatively, melt the chocolate in a heatproof bowl set over a pot of gently simmering water. The chocolate should be fluid but not scorching hot.
- Working with a few chilled balls at a time, drop one ball into the melted chocolate. Use a fork to gently roll it until coated, then lift it out, allowing excess chocolate to drip back into the bowl. Tap the fork lightly on the edge of the bowl for a thinner coating, then slide the coated ball back onto the parchment-lined baking sheet.
- While the chocolate coating is still soft, immediately sprinkle the tops with extra crushed Butterfinger, sea salt flakes, or festive sprinkles. Work fairly quickly so the toppings adhere before the chocolate sets.
- Return the baking sheet to the refrigerator for 20–30 minutes, or until the chocolate coating is fully set and firm.
- Once the chocolate is set, enjoy the Butterfinger balls right away or transfer them to an airtight container. Keep refrigerated until serving.