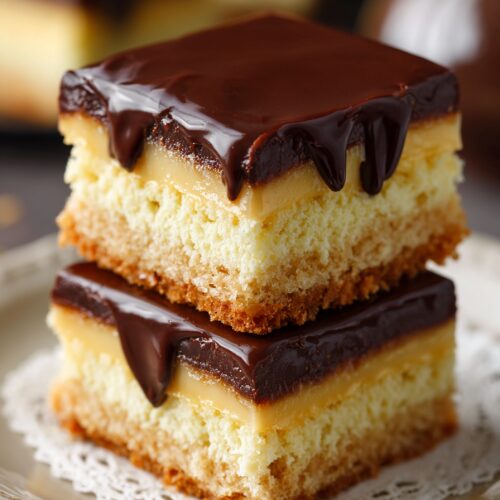
Boston Cream Pie Bars Recipe
If you love the classic Boston cream flavor but don’t want to fuss with layer cakes, this Boston Cream Pie Bars Recipe gives you all that custardy, chocolatey goodness in an easy dessert bar that’s perfect for sharing.
About These Boston Cream Pie Bars
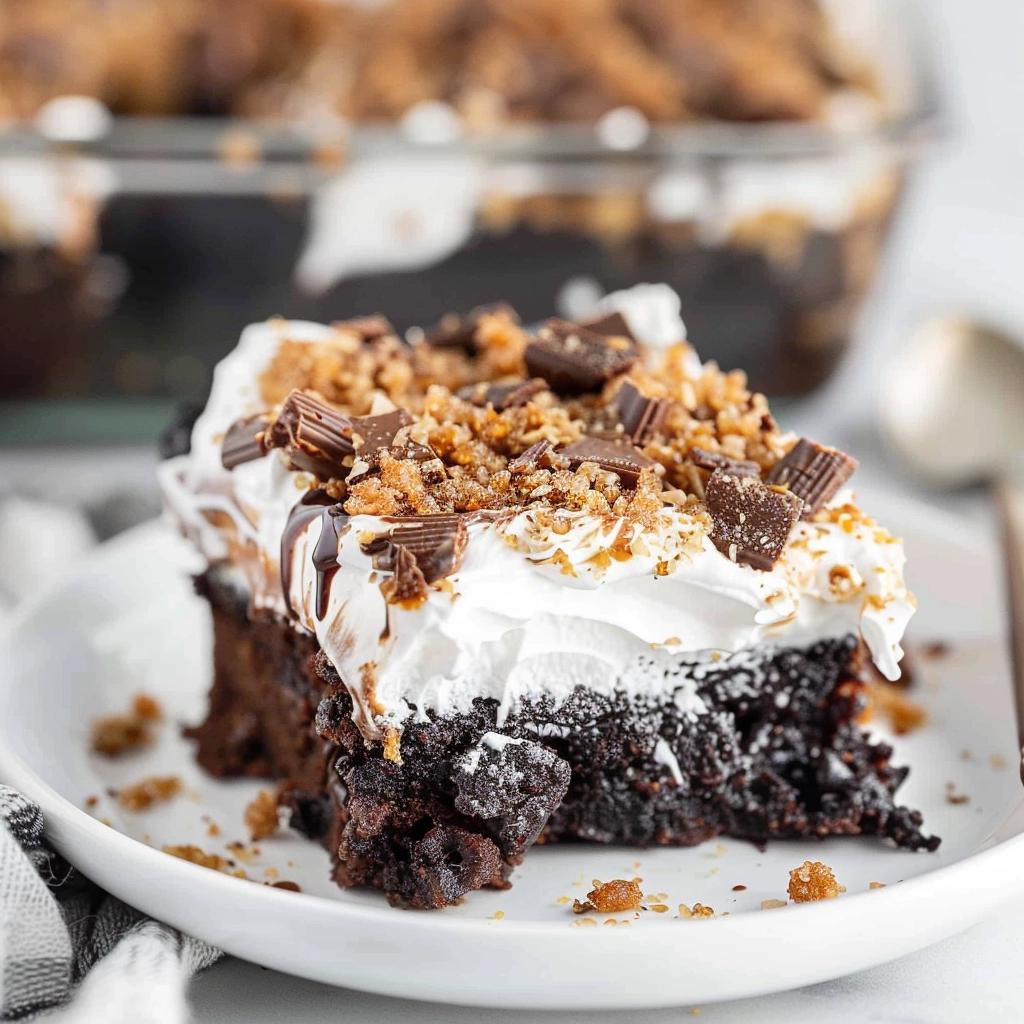
These Boston cream dessert bars take everything you love about the traditional pie—soft yellow cake, silky vanilla pudding filling, and a glossy chocolate ganache topping—and tuck it neatly into a 9×13 pan. Cut them into squares, and you’ve got the most charming custard filled bars for potlucks, church suppers, game nights, or just a cozy Sunday dessert.
I’m 50 now, and I’ll tell you, I’ve baked my fair share of fancy desserts. But you know what? The treats people ask for again and again are almost always the simple, nostalgic ones. This cream pie bar recipe is my answer when someone says, “Can you bring that Boston cream treat again?”
What makes this version special is how approachable it is. We start with a yellow cake base (yes, a box mix—no shame in that shortcut), whip up a lush vanilla pudding filling that sets up beautifully, and top it all with a shiny, soft chocolate ganache topping that slices like a dream. It’s a layered dessert recipe that looks impressive but feels friendly, not fussy.
You can make these Boston cream pie bars the day before you need them, and they hold up so well in the fridge. In fact, they’re better after a good chill, when the flavors settle in together and the layers cut cleanly.
Why You’ll Love This Recipe
- Classic Boston cream flavor without the fuss of a layer cake
- Easy dessert bars made in one 9×13 pan—perfect for sharing
- Uses simple pantry ingredients, including a yellow cake mix
- Vanilla pudding filling that’s thick, creamy, and stable for slicing
- Chocolate ganache topping that sets soft but not hard or waxy
- Great make-ahead dessert for potlucks, holidays, and office parties
- Kid-friendly flavors with grown-up nostalgia
- Flexible recipe—swap flavors, toppings, or even the base
Ingredients

For this Boston Cream Pie Bars Recipe, you’ll build three layers: a yellow cake base, a creamy vanilla layer, and a chocolate ganache topping.
For the Yellow Cake Base
- 1 box yellow cake mix (about 15.25 oz; I like Betty Crocker or Duncan Hines)
- Ingredients listed on the box (usually 3 large eggs, oil, and water)
- Tip: Replace the water with whole milk for a richer, sturdier base.
For the Vanilla Pudding Filling
- 2 boxes instant vanilla pudding mix, 3.4 oz each
- (French vanilla pudding is lovely if you find it.)
- 2 ½ cups cold whole milk
- 1 cup heavy cream, cold
- 1 teaspoon pure vanilla extract
- Pinch of fine sea salt (helps balance the sweetness)
Why this combo? The mix of milk and heavy cream gives the vanilla pudding filling more body, so your bars hold their shape but still taste soft and creamy.
For the Chocolate Ganache Topping
- 1 ½ cups semi-sweet chocolate chips (or finely chopped chocolate bar)
- ¾ cup heavy cream
- 1 tablespoon light corn syrup (optional, for shine and a softer set)
- 1 teaspoon pure vanilla extract
- Pinch of salt
You can use milk chocolate if you prefer a sweeter topping, but semi-sweet brings that classic Boston cream dessert bars balance—deep chocolate, not too sweet.
Directions
-
Prepare the pan.
Lightly grease a 9×13-inch baking pan with nonstick spray or butter. For easier slicing and lifting, line it with parchment paper, letting the edges hang over the sides like handles. -
Mix the yellow cake base.
In a large bowl, prepare the yellow cake mix according to the package directions, using milk instead of water if you’d like a richer crumb. Stir just until the batter is smooth; overmixing can make the cake tough. -
Bake the cake layer.
Pour the batter into the prepared pan and smooth the top with a spatula. Bake at the temperature listed on the box (usually 350°F) for about 22–28 minutes, or until the top is golden and a toothpick comes out clean. Every oven behaves a little differently, so start checking a few minutes early. -
Cool the cake completely.
Set the pan on a cooling rack and let the yellow cake base cool fully. This is important. If it’s even slightly warm, the custard layer can melt and turn soupy. If you’re in a hurry, you can cool it on the counter for 20 minutes, then pop it (uncovered) into the fridge for another 20. -
Whisk the vanilla pudding filling.
In a large mixing bowl, add the instant pudding mixes, cold milk, and cold heavy cream. Whisk for 2–3 minutes, until thick and smooth. The mixture will look like a very thick pudding. Stir in the vanilla and pinch of salt. Let it sit for 5 minutes to finish thickening. -
Spread the custard layer.
Once the cake is completely cool, spread the vanilla pudding filling evenly over the surface. Use an offset spatula or the back of a spoon to nudge it into the corners. Try not to press too hard on the cake base; think gentle, like frosting a soft sheet cake. -
Chill the first two layers.
Cover the pan lightly with plastic wrap and refrigerate for at least 30–45 minutes. This gives the custard filled bars a chance to set up before you add the warm ganache. If you’re juggling other dishes, it can sit in the fridge for a couple of hours with no problem. -
Make the chocolate ganache topping.
Place the chocolate chips in a heat-safe bowl. In a small saucepan, heat the heavy cream over medium-low until it just starts to steam and tiny bubbles appear around the edges. Don’t let it boil. Pour the hot cream over the chocolate, add the corn syrup and salt, and let it sit for 2–3 minutes. Then stir gently from the center outward until smooth and glossy. Stir in the vanilla. -
Cool the ganache slightly.
Let the ganache sit at room temperature for about 10 minutes. You want it warm and pourable, but not so hot that it melts the pudding layer. It should have the texture of warm fudge sauce. -
Layer on the chocolate.
Remove the pan from the fridge and gently pour the ganache over the custard layer. Tilt the pan or use a spatula to spread it to the edges. Work slowly so you don’t disturb the pudding underneath. -
Chill until fully set.
Return the Boston cream pie bars to the refrigerator. Chill at least 2 hours, or until the chocolate ganache topping is set and the bars are firm enough to slice. For the cleanest layers, chill 4 hours or overnight. -
Slice and serve.
Use the parchment “handles” to lift the whole slab onto a cutting board, if you used parchment. With a long, sharp knife, cut into 16–24 bars, wiping the knife clean between cuts for neat layers. Serve chilled for the best texture and that classic Boston cream flavor.
Servings & Timing
- Yield: About 16 large bars or up to 24 smaller bars
- Prep Time: 25–30 minutes (hands-on)
- Bake Time: 22–28 minutes
- Chill Time: 2–4 hours (or overnight for best results)
- Total Time: Approximately 3–5 hours, most of it chill time
I like to bake the yellow cake base in the morning, then finish the pudding and ganache layers later in the day. By dessert time, you’ve got perfect potluck dessert bars waiting in the fridge.
Variations
You can easily tweak this cream pie bar recipe to suit your crowd or mood:
- Chocolate-on-chocolate: Use a chocolate cake mix instead of yellow cake base for extra rich layered dessert bars.
- Lighter vanilla layer: Swap half the heavy cream in the filling for more milk for a slightly lighter custard.
- Mocha twist: Stir 1 teaspoon instant espresso powder into the ganache for a subtle coffee kick.
- Fruit-topped bars: Add a thin layer of sliced strawberries over the vanilla pudding filling before you pour the ganache.
- Gluten-free version: Use a gluten-free yellow cake mix and confirm your pudding mix is gluten-free.
- Extra fancy topping: Sprinkle the ganache with chocolate shavings or a tiny pinch of flaky sea salt.
Storage & Reheating
These bars are definitely fridge desserts, thanks to the vanilla pudding filling and heavy cream.
- Refrigerator: Store sliced or unsliced bars covered in the pan, or in an airtight container, for up to 4 days. The layers actually improve after the first day as everything settles together.
- Freezer: For longer storage, freeze the bars (well wrapped) for up to 2 months. Freeze them in a single layer, then stack with parchment between layers.
- Thawing: Thaw frozen bars in the refrigerator overnight. The ganache and custard will soften back to their original, creamy texture.
- Reheating: No reheating needed—these are meant to be enjoyed chilled. If you prefer a slightly softer top, let a bar sit at room temperature for about 10 minutes before serving.
For parties, I like to cut the bars ahead of time, then tuck the pan back in the fridge. Right before serving, I transfer them to a platter. Much less mess when guests start helping themselves.
Notes
A few things I’ve learned after making these Boston cream dessert bars more times than I care to admit:
- Cool means cool. The biggest issue I see is folks rushing the cooling. If the cake is warm or the pudding is loose, the layers will start to blend. Still tasty, just messier.
- Instant pudding, not cooked. Make sure you grab instant pudding mix. The cooked kind won’t set the same way without heating on the stove.
- Thicker filling for cleaner slices. Using both milk and heavy cream in the vanilla layer helps your custard filled bars hold up nicely on a dessert table.
- Don’t overheat the cream. Boiling cream can cause a grainy ganache. Heat until it’s steaming with small bubbles along the edge, then pour it over the chocolate and let it sit before stirring.
- Sharp knife, steady hand. For neat layers, chill well and use a long, sharp knife, wiping it off between cuts. It’s a tiny extra step that makes your bars look bakery-worthy.
- Plan ahead for crowds. If you’re feeding a big group, this recipe doubles well—bake two 9×13 pans instead of hunting down a huge pan.
If you enjoy this recipe, you might also like trying similar layered treats like eclair cake, chocolate pudding poke cake, or other easy dessert bars that start with a simple cake mix base.
FAQs
Can I make Boston cream pie bars a day ahead?
Yes, and they’re actually better that way. Make the full pan, cover, and chill overnight—the layers set up and the flavors blend.
Can I use homemade custard instead of instant pudding?
You can, but make sure it’s a thick pastry cream that sets firmly in the fridge; a thin custard might not slice well.
What if I don’t have heavy cream for the ganache?
You can use half-and-half, though the ganache will be a bit thinner and may set a little softer. Avoid using plain milk, which can make the topping too loose.
My filling is runny—what happened?
Most often, the pudding didn’t have enough time to thicken, or too much liquid was used. Check the box amounts, whisk a bit longer, and chill it well before cutting.
Can I use chocolate pudding instead of vanilla?
You can, though you’ll lose that classic Boston cream flavor. For a fun twist, try one vanilla box and one cheesecake-flavor box mixed together.
Do these travel well for potlucks?
Yes, as long as you keep them chilled during transport. I like to place the covered pan in an insulated bag with an ice pack underneath.
Can I make these bars without corn syrup in the ganache?
Absolutely. The corn syrup just adds shine and a touch of softness. Leave it out if you’d rather not use it; the ganache will still be delicious.
What’s the best way to cut really clean bars for a party platter?
Chill overnight, then use a long, sharp knife dipped in warm water and wiped dry between slices. Slow and steady makes those pretty, sharp layers.
Conclusion
This Boston Cream Pie Bars Recipe brings all the comfort of the classic dessert into an easy, crowd-friendly pan of bars—soft yellow cake base, creamy vanilla pudding filling, and a silky chocolate ganache topping. It’s the kind of boston cream treat that feels fancy enough for holidays but simple enough for a weeknight surprise.
I’d love for you to try these Boston cream dessert bars and tell me how they go in your kitchen. Leave a comment with your tweaks, share a photo of your pan, or explore more of my easy layered dessert recipes next time you’re planning a potluck or family gathering.
Boston Cream Pie Bars
Ingredients
- 1 box yellow cake mix about 15.25 oz; use your favorite brand
- ingredients listed on the yellow cake mix box usually 3 large eggs, oil, and water (you can replace the water with whole milk for a richer base)
- 2 boxes instant vanilla pudding mix 3.4 oz each; French vanilla if available
- 2 1/2 cups whole milk cold, for the vanilla pudding filling
- 1 cup heavy cream cold, for the vanilla pudding filling
- 1 teaspoon vanilla extract for the vanilla pudding filling
- fine sea salt pinch, for the vanilla pudding filling
- 1 1/2 cups semi-sweet chocolate chips or finely chopped semi-sweet chocolate, for ganache
- 3/4 cup heavy cream for the chocolate ganache topping
- 1 tablespoon light corn syrup optional, for shine and a softer set ganache
- 1 teaspoon vanilla extract for the chocolate ganache topping
- salt pinch, for the chocolate ganache topping
- nonstick spray or butter for greasing the pan
- parchment paper optional, for easy lifting and slicing
Instructions
- Lightly grease a 9x13-inch baking pan with nonstick spray or butter. For easier slicing and lifting, line it with parchment paper, letting the edges hang over the sides like handles.nonstick spray or butter, parchment paper
- In a large bowl, prepare the yellow cake mix according to the package directions, using milk instead of water if you’d like a richer crumb. Stir just until the batter is smooth; do not overmix.1 box yellow cake mix, ingredients listed on the yellow cake mix box
- Pour the batter into the prepared pan and smooth the top with a spatula. Bake at the temperature listed on the cake mix box (usually 350°F/175°C) for about 22–28 minutes, or until the top is golden and a toothpick inserted in the center comes out clean.
- Set the pan on a cooling rack and let the yellow cake base cool fully. If you’re in a hurry, cool it on the counter for about 20 minutes, then place it (uncovered) in the refrigerator for another 20 minutes until completely cool.
- In a large mixing bowl, add the instant vanilla pudding mixes, cold whole milk, and cold heavy cream. Whisk for 2–3 minutes, until thick and smooth and the mixture resembles very thick pudding. Stir in the vanilla extract and a pinch of fine sea salt, then let sit for 5 minutes to finish thickening.2 boxes instant vanilla pudding mix, 2 1/2 cups whole milk, 1 cup heavy cream, 1 teaspoon vanilla extract, fine sea salt
- Once the cake is completely cool, spread the vanilla pudding filling evenly over the surface. Use an offset spatula or the back of a spoon to nudge it gently into the corners without pressing too hard on the cake base.
- Cover the pan lightly with plastic wrap and refrigerate for at least 30–45 minutes, or up to a couple of hours, to allow the pudding layer to set before adding the warm ganache.
- Place the semi-sweet chocolate chips in a heat-safe bowl. In a small saucepan, heat the heavy cream over medium-low until it just starts to steam and tiny bubbles appear around the edges; do not let it boil. Pour the hot cream over the chocolate, add the light corn syrup and a pinch of salt, and let sit for 2–3 minutes. Stir gently from the center outward until smooth and glossy, then stir in the vanilla extract.1 1/2 cups semi-sweet chocolate chips, 3/4 cup heavy cream, 1 tablespoon light corn syrup, 1 teaspoon vanilla extract, salt
- Let the ganache sit at room temperature for about 10 minutes. It should be warm and pourable, with the texture of warm fudge sauce, but not so hot that it melts the pudding layer.
- Remove the pan from the refrigerator and gently pour the ganache over the set pudding layer. Tilt the pan or use a spatula to spread the ganache evenly to the edges, working slowly so you don’t disturb the pudding underneath.
- Return the pan to the refrigerator and chill for at least 2 hours, or until the chocolate ganache is set and the bars are firm enough to slice. For the cleanest layers, chill 4 hours or overnight.
- If you used parchment, use the overhanging edges to lift the whole slab onto a cutting board. With a long, sharp knife, cut into 16–24 bars, wiping the knife clean between cuts for neat layers. Serve chilled.