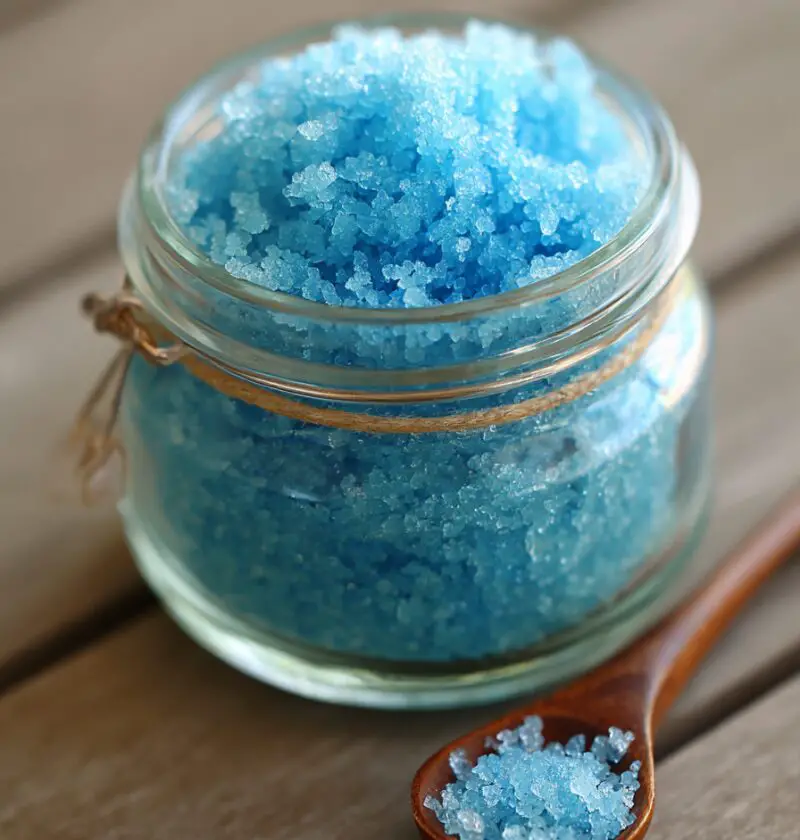
Blue Salt Trick Recipe: A Simple Kitchen Science Magic Show You Can Eat
If you’ve ever wanted to wow your guests with something fun, unexpected, and ridiculously easy, this Blue Salt Trick Recipe is your new party piece—a simple colored salt technique that turns plain salt into a bright, shimmering blue “magic dust” you can actually eat.
It’s part kitchen science trick, part party food trick, and part art project, and it all starts with the basic Blue Salt Trick Recipe: regular salt, a little food coloring, and a tiny bit of patience.
A Fun Little Story Behind This Blue Salt Trick Recipe
Let me tell you how this started. I’m a 50-year-old mom, a bit of a food nerd, and I host more family dinners than I can count. A few years back, my youngest niece was obsessed with “magic potions.” So one night, I brought out a little bowl of bright blue salt and sprinkled it over popcorn. Her eyes got huge. She whispered, “Is it wizard salt?”
And honestly, that’s exactly what this colored salt technique feels like—wizard salt made from the simplest pantry staple.
This Blue Salt Trick Recipe is:
- Perfect for decorating margarita glasses or cocktail rims
- Gorgeous on deviled eggs or hummus boards
- A fun culinary salt experiment to do with kids or grandkids
- Surprisingly useful for party themes—think ocean, Frozen, mermaid, winter wonderland, or baby shower
From a “healthy-ish” angle, you’re just using regular salt with a tiny drop or two of food coloring—no heavy frosting, no sugary sprinkles. It’s more of a decorative enhancement than a full dessert topping. And if you use a good quality sea salt or kosher salt, you’re starting from a solid base.
You can use this Blue Salt Trick Recipe to teach kids about how color changes perception. Blue salt on plain white popcorn suddenly looks gourmet. A simple soft-boiled egg with a sprinkle of blue salt looks like something from a fancy brunch menu.
Why You’ll Love This Blue Salt Trick Recipe
1. So easy it’s almost silly
You’re basically just coloring salt—but the payoff looks like you spent all afternoon.
2. Budget-friendly party wow factor
This is a party food trick that costs pennies compared with fancy store-bought decorations.
3. Customizable for any theme
Mermaid, galaxy, Frozen, ocean, winter, team colors—this colored salt technique adapts to everything.
4. Kid-approved kitchen science
It turns a regular kitchen moment into a hands-on kitchen science trick kids remember.
5. No baking, no special tools
No oven, no mixer, no fancy gear—just a bowl, spoon, and a baking sheet.
6. Make-ahead friendly
Once dried, your blue salt keeps for months in a jar, ready whenever inspiration strikes.
7. Versatile for sweet or savory
Use it on cocktails, roasted veggies, chocolate bark, popcorn, and even bread rolls.
8. Great gift or hostess touch
Pack it into a tiny glass jar with a label—“Mermaid Salt” or “Winter Sky Salt”—and you’ve got a charming homemade gift.
Ingredients
You’ll be surprised how short this list is, but I’ll give you some options so you can tweak it your way.
-
1 cup coarse salt or kosher salt
(Use a coarse or flaky salt like Diamond Crystal kosher salt, Maldon flakes, or a chunky sea salt. The larger crystals show off the color better than fine table salt.) -
2–4 drops blue liquid food coloring
(Standard grocery store blue food coloring works fine; gel food coloring gives a more intense shade and uses less.) -
1–2 teaspoons water – optional, see note below
(Helps distribute the color if you’re using thicker gel coloring.) -
1 teaspoon neutral oil (optional)
(Something like canola or grapeseed oil can help the color coat more evenly—use only if you want a more “glistening” look. Skip it if you prefer a dry, powdery salt.) -
Optional add-ins for variation
- ¼ teaspoon edible shimmer dust or luster dust (for a sparkling effect)
- ⅛ teaspoon fine garlic powder or onion powder (if you want a savory seasoning twist)
- ½ teaspoon citrus zest, very dry and finely grated (lemon or lime for a fragrant salt—dry it separately first)
Ingredient tips:
- If you’re planning to use this Blue Salt Trick Recipe on cocktails or desserts, stick with plain salt and maybe some shimmer.
- For savory dishes, a tiny bit of garlic powder or herbs can turn it into a flavored blue finishing salt.
- Always start with fewer drops of food coloring and build up. It’s easier to make the color deeper than to fix a too-dark batch.

Directions
1. Prepare your workspace
Line a baking sheet or large plate with parchment paper. This not only keeps the salt from sticking, but also makes it easier to spread thinly so it dries faster. Have a small bowl and spoon ready.
2. Add the salt to a bowl
Pour your 1 cup of coarse or kosher salt into a medium mixing bowl. Break up any big clumps with the back of your spoon or your fingers—loose, separated grains will color more evenly.
3. Add the blue coloring—slowly
Start with 2 drops of blue food coloring right on top of the salt. If you’re using gel coloring, mix it with 1 teaspoon of water first so it doesn’t clump. You can always build the color up later, so resist the urge to squirt half the bottle in.
4. Stir until the color starts to cling
Use your spoon to mix, pressing the color into the salt. At first it may look patchy—that’s normal. Just keep stirring, smashing, scraping the bottom and sides of the bowl. If you see some grains staying white, sprinkle in another drop of coloring or a tiny splash of water to help spread it.
5. Adjust the color level
Take a look at your salt. Want a pale, icy blue for a winter theme? You might stop after 2–3 drops. Want a bold, bright party blue? Add another drop, stir again, and see how it looks. Remember: the color looks a bit darker when the salt is wet. It’ll lighten slightly as it dries.
6. Optional: Add a tiny bit of oil for shine
If you’d like your salt to have a glossy, almost jewel-like look, add 1 teaspoon of neutral oil and stir well, making sure every crystal gets a light coating. This works especially well if you’re using the blue salt on popcorn or as a garnish on savory dishes. For cocktails or rim sugar-style finishes, I usually skip the oil.
7. Spread the blue salt to dry
Transfer the blue salt mixture to your parchment-lined baking sheet. Use the back of your spoon or your hands to spread it into a thin, even layer. The thinner it is, the quicker it dries. Break up any big chunks so the moisture can escape.
8. Air dry or oven dry (low and slow)
- Air dry method: Leave the tray at room temperature for 12–24 hours, stirring once or twice to help it dry evenly.
- Quick-dry method: Place the tray in the oven on the lowest temperature setting (around 170–200°F / 75–95°C) for 15–30 minutes. Stir halfway through and watch closely—you’re just drying it, not baking or toasting it.
9. Check for dryness
The salt should feel dry to the touch, not tacky or damp. If you pinch a bit, it should fall apart into grains, not clump into sticky chunks. If it still feels moist, give it more time—five or ten minutes in the warm oven usually finishes the job.
10. Break up and store
Once completely dry, use your fingers or a clean spoon to break up any remaining clumps. Pour your blue salt into an airtight jar or spice container. Label it (especially if you added flavors), and store at room temperature away from moisture and direct light.
Servings & Timing
- Yield: About 1 cup of blue salt
- Prep Time: 10 minutes actual hands-on time
- Drying Time: 15–30 minutes in a low oven, or 12–24 hours at room temperature
- Total Time: 25–40 minutes with oven drying, or up to 1 day if air-drying
The beauty of this Blue Salt Trick Recipe is that the active time is tiny—most of the “time” is just letting the salt dry while you’re doing other things.
Fun Variations on the Blue Salt Trick Recipe
Once you’ve made it once, your brain will start firing off ideas. Here are some to get you started:
- Ocean-Theme Salt – Add a drop of green food coloring along with the blue for a sea-glass, teal ocean salt.
- Galaxy Salt – Mix in a pinch of edible silver or pearl luster dust for a starry-night look; use it on dark chocolate bark.
- Citrus Blue Salt – Stir in dried lemon or lime zest for a bright aroma; perfect on grilled fish or roasted veggies.
- Smoky Blue Salt – Add a tiny pinch of smoked paprika or smoked salt for a campfire-meets-mermaid flavor.
- Pastel Party Mix – Make separate small batches in blue, pink, and purple, then combine them for a playful confetti salt.
- Spicy Blue Salt – Stir in a pinch of cayenne or chili powder for a surprising kick on popcorn or avocado toast.
Storage & Make-Ahead Tips
- How to store: Keep your blue salt in an airtight jar or spice container at room temperature, away from moisture and direct sunlight. A small mason jar, empty spice jar, or even a cleaned baby-food jar works well.
- Shelf life: Up to 6 months for plain blue salt. If you’ve added citrus zest or other flavorings, I’d use it within 2–3 months for the best aroma.
- Re-drying, if needed: If the salt ever clumps or feels slightly damp (especially in humid climates), spread it on a tray and warm it in the oven at 170–200°F for 10–15 minutes, then cool and re-store.
- Make-ahead: This is 100% make-ahead friendly. I like to make a big batch before the holidays, then just pull it out for cocktails, charcuterie boards, and last-minute gifts.
Since this isn’t a heated dish, there’s no reheating in the usual sense—just occasional re-drying if humidity sneaks in.
Notes From My Kitchen (And a Few Lessons Learned)
- Start lighter than you think with color. I once went overboard with the food coloring and ended up with a salt so dark it almost looked black under dim light. Pretty for Halloween, not so much for a baby shower. Build the color slowly.
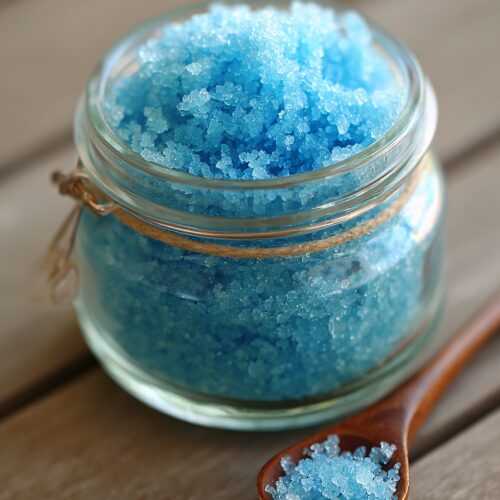
- Texture matters. Fine table salt will work, but the visual effect is much less dramatic. Coarse, flaky grains really show off that salt color change and give you that “wow” factor on the plate.
- Food coloring flavor is minimal—but not zero. Use a light hand, especially with cheap liquid colors. Too much can bring a faint chemical taste. Most people won’t notice, but your more sensitive tasters might.
- Kids love the “transformation moment.” If you’re doing this with children, let them be the one to stir while the salt changes color. Explain how the color coats the crystals—like painting tiny rocks. It’s science dressed up as craft time.
- Label your jars clearly. Blue garlic salt looks like plain decorative salt, and you really don’t want that on a sweet cocktail rim—ask me how I know.
- Play with contrasting foods. Blue salt looks stunning on white or pale foods: eggs, white cheese, yogurt dips, mashed potatoes, vanilla ice cream, coconut bars. It practically glows.
FAQs About the Blue Salt Trick Recipe
1. Is blue salt safe to eat?
Yes, as long as you’re using regular edible salt and food-grade coloring. Standard grocery store food coloring is designed for consumption.
2. Can I use gel food coloring instead of liquid?
Absolutely. Gel coloring works very well—just mix a tiny bit with water first so it blends more evenly into the salt.
3. How do I keep the salt from clumping?
Make sure it’s fully dry before storing. Spread it thin, give it enough time to dry, and if needed, re-dry it in a low oven. Store it in a very dry, sealed container.
4. Will the blue color stain my hands or dishes?
While you’re making it, a little color may get on your fingers, but it usually washes off with soap and warm water. Once the salt is dry and used as a garnish, it shouldn’t stain dishes or lips in any noticeable way if you’ve used a reasonable amount of coloring.
5. Can I use this on hot food?
Yes. You can sprinkle it on hot dishes like roasted potatoes, grilled fish, or steamed veggies. Just know that very intense heat and moisture can sometimes soften the color slightly, so use it as a finishing touch right before serving.
6. Can I make other colors with the same technique?
Definitely. The same method works for pink, purple, green—you name it. Just adjust the number of drops and remember that mixed colors (like purple from red + blue) may look a bit different once dry.
7. Is this okay for people who are sensitive to artificial colors?
If anyone in your family is sensitive to artificial dyes, look for natural food colorings made from plants, like spirulina-based blue color. They’re usually labeled as natural or plant-based food coloring.
8. Does the blue salt taste different from regular salt?
Plain blue salt tastes almost exactly like regular salt. If you don’t go overboard with the coloring, most people won’t notice any difference in flavor at all.
Conclusion: A Little Kitchen Magic Goes a Long Way
This Blue Salt Trick Recipe is one of those tiny, joyful things that turns everyday food into something people talk about on the way home. It’s simple, it’s budget-friendly, and it makes you look like the fun, creative host—without breaking a sweat.
If you give this blue salt trick a try, I’d love to hear how you used it—cocktails, popcorn, brunch, kids’ parties? Leave a comment, share your photos, or explore more of my easy “kitchen science” recipes and party-ready food tricks next.
Blue Salt Trick Recipe (Edible Blue Colored Salt)
Ingredients
- 1 cup coarse or kosher salt such as Diamond Crystal kosher salt, Maldon flakes, or chunky sea salt
- 2-4 drops blue liquid food coloring or gel food coloring mixed with water
- 1-2 teaspoons water optional, to help distribute thicker gel coloring
- 1 teaspoon neutral oil optional, such as canola or grapeseed oil, for a glossy finish
- 1/4 teaspoon edible shimmer dust or luster dust optional, for sparkling effect
- 1/8 teaspoon fine garlic powder or onion powder optional, for a savory seasoning twist
- 1/2 teaspoon citrus zest optional; very dry and finely grated lemon or lime zest, dried separately first
Instructions
- Line a baking sheet or large plate with parchment paper so the salt doesn’t stick and can be spread thin to dry quickly. Have a small bowl and spoon ready.
- Pour 1 cup of coarse or kosher salt into a medium mixing bowl. Break up any clumps with the back of a spoon or your fingers so the grains are loose and separate.1 cup coarse or kosher salt
- Start with 2 drops of blue food coloring on top of the salt. If using gel food coloring, mix it first with about 1 teaspoon of water to thin it before adding. You can deepen the color later if needed.2-4 drops blue liquid food coloring, 1-2 teaspoons water
- Use a spoon to mix, pressing and scraping the color into the salt. At first the color will look patchy; keep stirring and pressing. If many grains stay white, add another drop of coloring or a tiny splash of water and continue mixing until most grains are tinted.1 cup coarse or kosher salt, 2-4 drops blue liquid food coloring, 1-2 teaspoons water
- Decide how intense you want the blue. For a pale, icy blue, 2–3 drops may be enough. For a bold, bright blue, add another drop, stir, and reassess. Remember the salt looks a bit darker while wet and will lighten slightly as it dries.2-4 drops blue liquid food coloring
- For a glossy, jewel-like finish, add up to 1 teaspoon neutral oil and stir until all crystals are lightly coated. If desired, stir in edible shimmer dust for sparkle, a pinch of garlic or onion powder for savory flavor, or very dry citrus zest for aroma. Mix until evenly distributed.1 teaspoon neutral oil, 1/4 teaspoon edible shimmer dust or luster dust, 1/8 teaspoon fine garlic powder or onion powder, 1/2 teaspoon citrus zest
- Transfer the colored salt to the parchment-lined baking sheet and spread it into a thin, even layer with the back of a spoon or your hands. Break up any large clumps so moisture can escape and the salt dries evenly.1 cup coarse or kosher salt
- For air drying, leave the tray at room temperature for 12–24 hours, stirring once or twice to help it dry evenly. For a quicker method, place the tray in the oven on the lowest setting (about 170–200°F / 75–95°C) for 15–30 minutes, stirring halfway through. You are just drying the salt, not baking or toasting it.
- When fully dry, the salt should feel dry, not tacky. If you pinch some, it should fall apart into grains instead of sticking together in moist clumps. If it still feels damp, continue drying for another 5–10 minutes in the warm oven or more time at room temperature.
- Once completely dry, break up any remaining clumps with clean fingers or a spoon. Transfer the blue salt to an airtight jar or spice container, label it (and note any flavors you added), and store at room temperature away from moisture and direct light.1 cup coarse or kosher salt