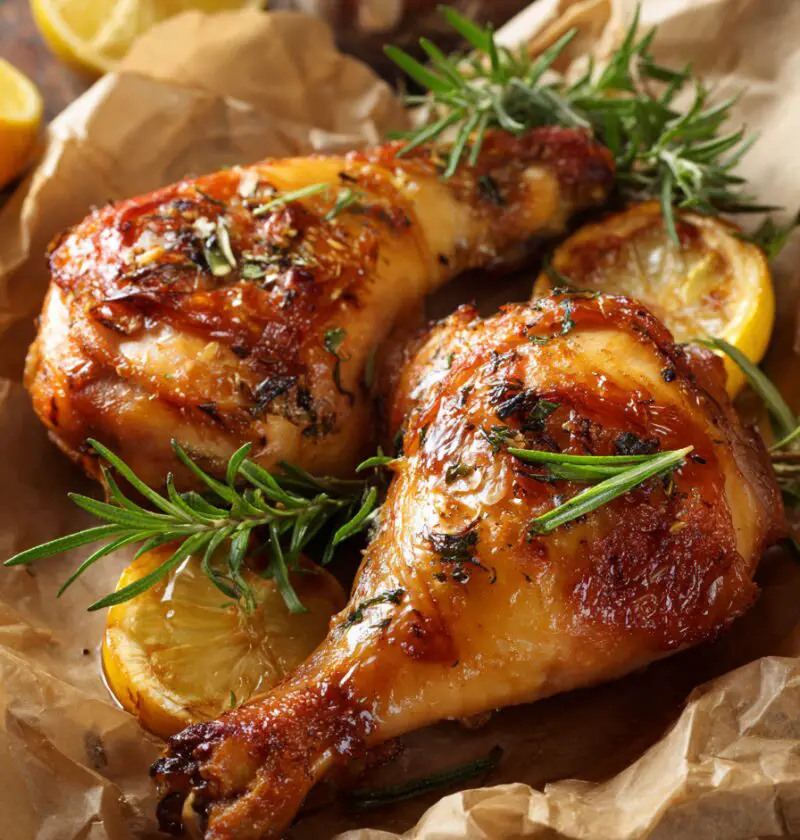
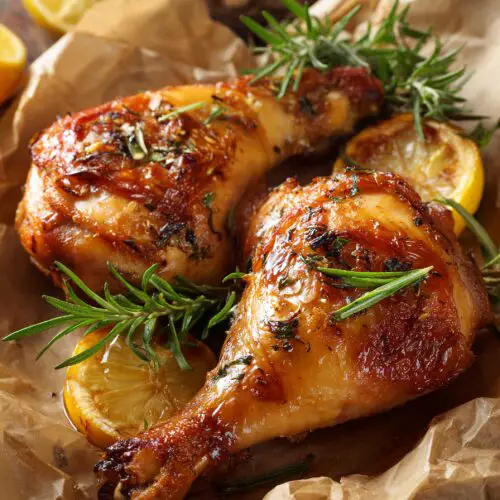
Baked Chicken Hindquarters Recipe
This Baked Chicken Hindquarters Recipe gives you juicy meat, crispy skin, and big flavor with hardly any fuss—exactly the kind of easy baked chicken recipe that makes weeknight dinners feel special without turning your kitchen upside down.
I’ve been roasting chicken in one form or another for over 30 years, and chicken hindquarters (also called chicken leg quarters) are still one of my go‑to cuts. They’re budget-friendly, stay wonderfully juicy in the oven, and take on seasoning like a dream. This baked chicken hindquarters recipe is my reliable, “everyone’s coming over and I don’t want to stress” dinner. It’s simple enough for Tuesday, but tasty enough for company on Sunday.
You get that classic roasted chicken hindquarters flavor—crispy, well-seasoned skin, tender dark meat, and plenty of pan juices—without babysitting a whole bird. I usually serve these oven baked chicken quarters with roasted vegetables and a simple salad. When my kids were little, it was mashed potatoes all the way and nobody complained.
Let’s walk through it together, and I’ll share every little trick I’ve learned so your chicken comes out perfectly juicy and browned every single time.
Why You’ll Love This Recipe
- Crispy skin, juicy meat – High-heat roasting gives you crispy baked chicken hindquarters with moist, flavorful dark meat every time.
- Budget-friendly protein – Chicken hindquarters are usually one of the most affordable cuts, so this makes a generous family dinner chicken recipe without a big price tag.
- Hands-off cooking – After a quick prep, the oven does the work—perfect for busy weeknight chicken dinners when you’re juggling homework, emails, and maybe a little laundry.
- Super flavorful seasoning – A simple blend of pantry spices and a touch of olive oil gives you seasoned chicken hindquarters that taste like you fussed way more than you did.
- Flexible for any side dish – These baked chicken leg quarters pair with roasted veggies, rice, pasta, potatoes, or even a big green salad; they’re like the little black dress of chicken.
- Great for meal prep – Leftovers reheat beautifully, so you can bake extra for lunches, grain bowls, or quick dinners later in the week.
- Easy to scale up – Need to feed two or ten? This oven baked chicken quarters method scales up without any fancy math.
- Crowd-pleasing flavor – The seasoning is family-friendly but bold enough that adults will happily go back for seconds.
- No special equipment – Just a baking sheet, a wire rack if you have one, and a regular oven. That’s it.
Ingredients
For this Baked Chicken Hindquarters Recipe, you’ll need:
-
4–6 chicken hindquarters (leg quarters), bone-in, skin-on
(About 3–4 pounds total; look for pieces with intact skin for the crispiest results.) -
2 tablespoons olive oil
(Extra virgin or a mild, good-quality oil—this helps the seasoning stick and the skin crisp.) -
2 teaspoons kosher salt
(Use a little less if you’re using fine table salt; kosher salt is easier to sprinkle evenly.) -
1 teaspoon freshly ground black pepper
(Freshly ground gives better flavor, but pre-ground is just fine on a busy night.) -
2 teaspoons garlic powder
(Not garlic salt—this keeps your seasoning balanced.) -
2 teaspoons onion powder
-
2 teaspoons smoked paprika
(You can use sweet paprika if that’s what you have; smoked adds a lovely, subtle BBQ note.) -
1 teaspoon dried thyme
(Or you can swap in dried oregano or Italian seasoning for a slightly different vibe.) -
1 teaspoon dried rosemary, crushed
(Roll it between your fingers to break it up—this releases more flavor.) -
1 teaspoon brown sugar (optional, but recommended)
(Helps with browning and adds the faintest hint of sweetness.) -
1 tablespoon lemon juice
(Fresh is best, but bottled will do—this brightens the flavor of the dark meat.) -
1 tablespoon Worcestershire sauce or soy sauce
(Adds umami depth; this is my not-so-secret trick for truly savory roasted chicken hindquarters.) -
1 small onion, sliced (optional, for under the chicken)
(Creates a little “bed” that flavors the pan juices and keeps the bottom from sticking.) -
2–3 garlic cloves, smashed (optional)
(For extra aroma in the oven and flavor in the drippings.)
A quick note from my kitchen: if your chicken hindquarters are very wet from the package, pat them dry really well with paper towels. Dry skin = crispier skin, and that’s half the joy of a good baked chicken leg quarters recipe.
Directions
-
Preheat the oven and prep your pan
Preheat your oven to 400°F (200°C). Line a large rimmed baking sheet with foil or parchment for easier cleanup, then set a wire rack on top if you have one. The rack helps the air circulate around the chicken and makes crispy baked chicken hindquarters much easier. No rack? Just grease the foil lightly and you’re fine. -
Pat the chicken dry
Place the chicken hindquarters on a cutting board or sheet of paper towels. Pat them very dry on all sides, especially the skin. This simple step makes an enormous difference in how crispy that skin gets. If there’s any excess fat hanging off, you can trim it with kitchen shears. -
Season under and over the skin
In a small bowl, mix together the salt, pepper, garlic powder, onion powder, smoked paprika, thyme, rosemary, and brown sugar. Drizzle the olive oil over the chicken and rub it all over. Then gently loosen the skin from the meat with your fingers and massage some of the spice mixture directly onto the meat under the skin. Sprinkle the remaining seasoning all over the outside. This is where the magic happens—seasoned chicken hindquarters from the inside out. -
Add flavor boosters to the pan
Spread the sliced onion and smashed garlic (if using) over the prepared baking sheet. They’ll flavor the drippings and make your kitchen smell amazing. Lay the seasoned chicken hindquarters on top, skin-side up, leaving just a bit of space between each piece so the heat can circulate. -
Finish with lemon and Worcestershire
In a small cup, stir together the lemon juice and Worcestershire sauce (or soy sauce). Brush or spoon this mixture evenly over the chicken skin. It adds brightness, color, and that savory depth you find in really good roasted chicken hindquarters. -
Bake until golden and cooked through
Place the pan on the center rack and bake for 40–50 minutes, depending on the size of your chicken pieces. About halfway through, rotate the pan for more even browning. The chicken is done when an instant-read thermometer inserted into the thickest part (not touching the bone) reads 175–185°F (80–85°C). Dark meat is happiest a bit higher than the 165°F you see for chicken breasts—it gets more tender and juicy. -
Optional: crisp the skin further
If the chicken is cooked through but you’d like a little extra crisp, turn the oven to broil and cook for 2–4 minutes, watching very closely. The skin can go from perfect to too dark quickly, so don’t walk away. -
Rest and serve
Transfer the baked chicken leg quarters to a platter and let them rest for 5–10 minutes. This helps the juices redistribute, so every bite is nice and moist. Spoon a little of the pan drippings over the top if you’d like, and serve with your favorite sides. I love them with roasted potatoes or rice to catch those savory juices.
And that’s it—your oven baked chicken quarters are ready, crispy on the outside and juicy on the inside, just the way they should be.
Servings & Timing
- Yield: 4–6 servings (one chicken hindquarter per person, depending on appetite)
- Prep Time: 10–15 minutes
- Cook Time: 40–50 minutes
- Rest Time: 5–10 minutes
- Total Time: About 1 hour
You can easily double this Baked Chicken Hindquarters Recipe by using a second baking sheet so the pieces aren’t crowded.
Variations
You know what? Once you master the basic baked chicken hindquarters method, it’s fun to play around. Here are a few of my favorite twists:
- Lemon Herb Roasted Chicken Hindquarters – Skip the smoked paprika and brown sugar; use extra thyme, fresh rosemary, and plenty of lemon zest for a bright, Mediterranean feel.
- Spicy Cajun Baked Chicken Leg Quarters – Swap the seasoning for a tablespoon of Cajun or Creole seasoning and a pinch of cayenne for heat.
- Honey Mustard Oven Baked Chicken Quarters – Mix 2 tablespoons Dijon mustard with 1 tablespoon honey and brush over the chicken for the last 15 minutes of baking.
- Garlic Parmesan Crispy Baked Chicken Hindquarters – After baking, sprinkle with freshly grated Parmesan, minced parsley, and an extra pinch of garlic powder.
- BBQ-Style Roasted Chicken Hindquarters – Rub with the base seasoning, then brush with your favorite barbecue sauce during the last 10 minutes of baking.
- Low-Sodium Version – Reduce the salt by half and lean on extra herbs, garlic powder, and lemon juice for flavor.
Storage & Reheating
One of the reasons I love this baked chicken hindquarters recipe for busy weeks is how well it keeps.
-
Refrigerator:
Store cooled leftover chicken in an airtight container in the fridge for 3–4 days. If you like, you can remove the meat from the bones for easier meal prep later. -
Freezer:
Wrap each piece tightly in plastic wrap or foil, then place in a freezer bag or container. Freeze for up to 3 months. Label it—future you will be grateful. -
Reheating in the oven (best for crisp skin):
Place chicken on a baking sheet and warm at 350°F (175°C) for 15–20 minutes, or until hot. For extra crispiness, broil for 1–2 minutes at the end. -
Reheating in the microwave (fastest):
Remove the bone if you like, cover the chicken with a damp paper towel, and microwave in short bursts until hot. The skin won’t stay as crisp, but the meat will be tender. -
Make-ahead tip:
You can season the chicken hindquarters and keep them covered in the fridge for up to 24 hours before baking. This actually deepens the flavor and makes your weeknight chicken dinner even easier.
Notes from My Kitchen
-
Let dark meat go a little higher.
I know the official food safety minimum for chicken is 165°F, but dark meat like legs and thighs is more forgiving and actually tastes better and more tender around 175–185°F. It’s not dry at that temperature—it’s silky. -
Don’t be shy with salt.
Dark meat can handle seasoning. Just remember that if your seasoning blend already has salt (like some Cajun mixes), reduce the extra salt you add. -
Use what you have.
If you only have sweet paprika instead of smoked, or regular onion instead of dried onion powder, use them. This baked chicken hindquarters recipe is very forgiving. -
Give it space.
Crowding the pan makes the chicken steam instead of roast. If your pieces are squished together, use two pans. That’s the difference between “pretty good” and “wow, how did you get it so crispy?” -
Pan drippings are liquid gold.
I often spoon the drippings over rice, roasted potatoes, or even steamed green beans. You can also whisk in a little butter or flour and water to make a quick pan gravy. -
Family-friendly seasoning.
My grandkids aren’t big on spicy food, so this version keeps the heat very mild. If your crew loves spice, add chili powder or cayenne to taste.
FAQs
1. What temperature should I bake chicken hindquarters at?
For juicy meat and crispy skin, bake chicken hindquarters at 400°F (200°C). It’s hot enough to brown the skin without drying the meat.
2. How long does it take to bake chicken hindquarters?
Depending on size, baked chicken hindquarters usually take 40–50 minutes. I recommend using an instant-read thermometer and aiming for 175–185°F in the thickest part.
3. Can I use this recipe for other cuts, like thighs or drumsticks?
Yes. You can use this same seasoning and method for bone-in thighs or drumsticks; just start checking them a little earlier, around 30–35 minutes.
4. How do I keep the chicken from drying out?
Leave the skin on, don’t overcook, and let the meat rest for a few minutes after baking. Dark meat is naturally more forgiving and stays moist longer than breasts.
5. Can I make this baked chicken hindquarters recipe in a glass baking dish?
You can, but the chicken may not crisp quite as well as on a metal baking sheet. If you use glass, don’t broil, and allow a little extra time for the heat to circulate.
6. Is this recipe gluten-free?
Yes, as written it’s naturally gluten-free—just be sure your Worcestershire sauce (or soy sauce if you’re substituting) is certified gluten-free if that’s important for your family.
7. Can I marinate the chicken first?
Absolutely. You can marinate the chicken in a mixture of lemon juice, olive oil, garlic, and herbs for a few hours, then pat dry and proceed with the seasoning in this recipe for extra flavor.
8. Why is my chicken skin not getting crispy?
Usually it’s one of three things: the skin wasn’t dried well, the pieces were crowded (causing steam), or the oven temperature was too low. Make sure to pat the chicken dry, give it space, and bake at 400°F.
Conclusion
This Baked Chicken Hindquarters Recipe is exactly the kind of thing I lean on when I want a cozy, satisfying, no-drama dinner—big flavor, simple ingredients, and a method that just plain works. You get golden, seasoned, crispy baked chicken hindquarters with juicy meat and enough leftovers to make tomorrow a little easier.
If you try this recipe, let me know how it turned out for you—did your family love it, too? Leave a comment with your tweaks, or share what sides you served. And if you enjoy hearty, family-style chicken dishes, you might like exploring more easy baked chicken recipes from my kitchen next.
Baked Chicken Hindquarters
Ingredients
- 4-6 pieces chicken hindquarters (leg quarters), bone-in, skin-on about 3–4 pounds total; look for pieces with intact skin
- 2 tablespoons olive oil extra virgin or mild, good-quality
- 2 teaspoons kosher salt use a little less if using fine table salt
- 1 teaspoon freshly ground black pepper
- 2 teaspoons garlic powder not garlic salt
- 2 teaspoons onion powder
- 2 teaspoons smoked paprika or sweet paprika if preferred
- 1 teaspoon dried thyme or dried oregano or Italian seasoning
- 1 teaspoon dried rosemary crushed between fingers to release more flavor
- 1 teaspoon brown sugar optional, helps with browning and adds mild sweetness
- 1 tablespoon lemon juice fresh preferred
- 1 tablespoon Worcestershire sauce or soy sauce adds savory umami depth
- 1 small onion sliced, optional, for under the chicken
- 2-3 cloves garlic smashed, optional, for extra aroma
Instructions
- Preheat your oven to 400°F (200°C). Line a large rimmed baking sheet with foil or parchment for easier cleanup, then set a wire rack on top if you have one. If not using a rack, lightly grease the foil.
- Place the chicken hindquarters on a cutting board or paper towels and pat very dry on all sides, especially the skin. Trim any large excess pieces of fat if needed.
- In a small bowl, mix together the salt, pepper, garlic powder, onion powder, smoked paprika, dried thyme, dried rosemary, and brown sugar (if using). Drizzle the olive oil over the chicken and rub it all over. Gently loosen the skin from the meat with your fingers and rub some of the spice mixture directly onto the meat under the skin. Sprinkle the remaining seasoning evenly over the outside of the chicken.
- Spread the sliced onion and smashed garlic (if using) over the prepared baking sheet. Lay the seasoned chicken hindquarters on top, skin-side up, leaving a little space between each piece so the heat can circulate.
- In a small cup, stir together the lemon juice and Worcestershire sauce (or soy sauce). Brush or spoon this mixture evenly over the chicken skin.
- Place the pan on the center rack and bake for 40–50 minutes, rotating the pan halfway through for even browning. The chicken is done when an instant-read thermometer inserted into the thickest part of the meat (not touching the bone) reads 175–185°F (80–85°C).
- If the chicken is cooked through but you want extra-crispy skin, turn the oven to broil and cook for 2–4 minutes, watching closely so the skin does not burn.
- Transfer the baked chicken hindquarters to a platter and let rest for 5–10 minutes to allow the juices to redistribute. Spoon some of the pan drippings over the top if desired and serve with your favorite sides.
Notes
- Lemon Herb: skip smoked paprika and brown sugar; use extra thyme, fresh rosemary, and lemon zest.
- Spicy Cajun: use Cajun or Creole seasoning and a pinch of cayenne.
- Honey Mustard: mix 2 tbsp Dijon with 1 tbsp honey and brush on during the last 15 minutes of baking.
- Garlic Parmesan: after baking, sprinkle with grated Parmesan, minced parsley, and extra garlic powder.
- BBQ-Style: brush with BBQ sauce during the last 10 minutes of baking.
- Low-Sodium: reduce the salt by half and increase herbs, garlic powder, and lemon juice. Storage & Reheating:
- Refrigerate leftovers in an airtight container for 3–4 days.
- Freeze tightly wrapped pieces for up to 3 months.
- Reheat in the oven at 350°F (175°C) for 15–20 minutes; broil briefly to re-crisp skin.
- For fast reheating, microwave covered with a damp paper towel until hot (skin will soften).
- You can season the chicken and refrigerate up to 24 hours before baking for deeper flavor. Tips: Cook dark meat to 175–185°F for best texture, don’t crowd the pan to avoid steaming, and use the pan drippings over rice, potatoes, or vegetables.